Hello and welcome! This week our new challenge over at the The Funkie Junkie Blog is "Scotch it is”. July 27th is National Scotch Day. Why not be inspired by Scotch? You can be inspired by Scotch in any way you want to interpret it, including and not limited to: tape, plaid, liquor, or any way you are inspired by the word Scotch. Make sure to share with us how you were inspired!
I greatly look forward to seeing your creative makes for this challenge. This challenge is open from July 27tn to August 9th 2022.
The guidelines for entering are simple; create a new vintage or shabby chic project following the challenge theme, link it to your post (not just your blog) and also include a link to this challenge in your post. You can combine our challenge with up to 10 challenges (including this one) to be in with a chance for winning. Don’t forget you can also join the fun through Instagram as well. To enter on Instagram: If you are entering through a public forum (such as Instagram) you'll need to include the words 'Funkie Junkie Boutique Challenge'. Be sure to stop over to the blog to see all the details of the challenge. While you're there check out the fantastic creations my talented teammates made to inspire you!
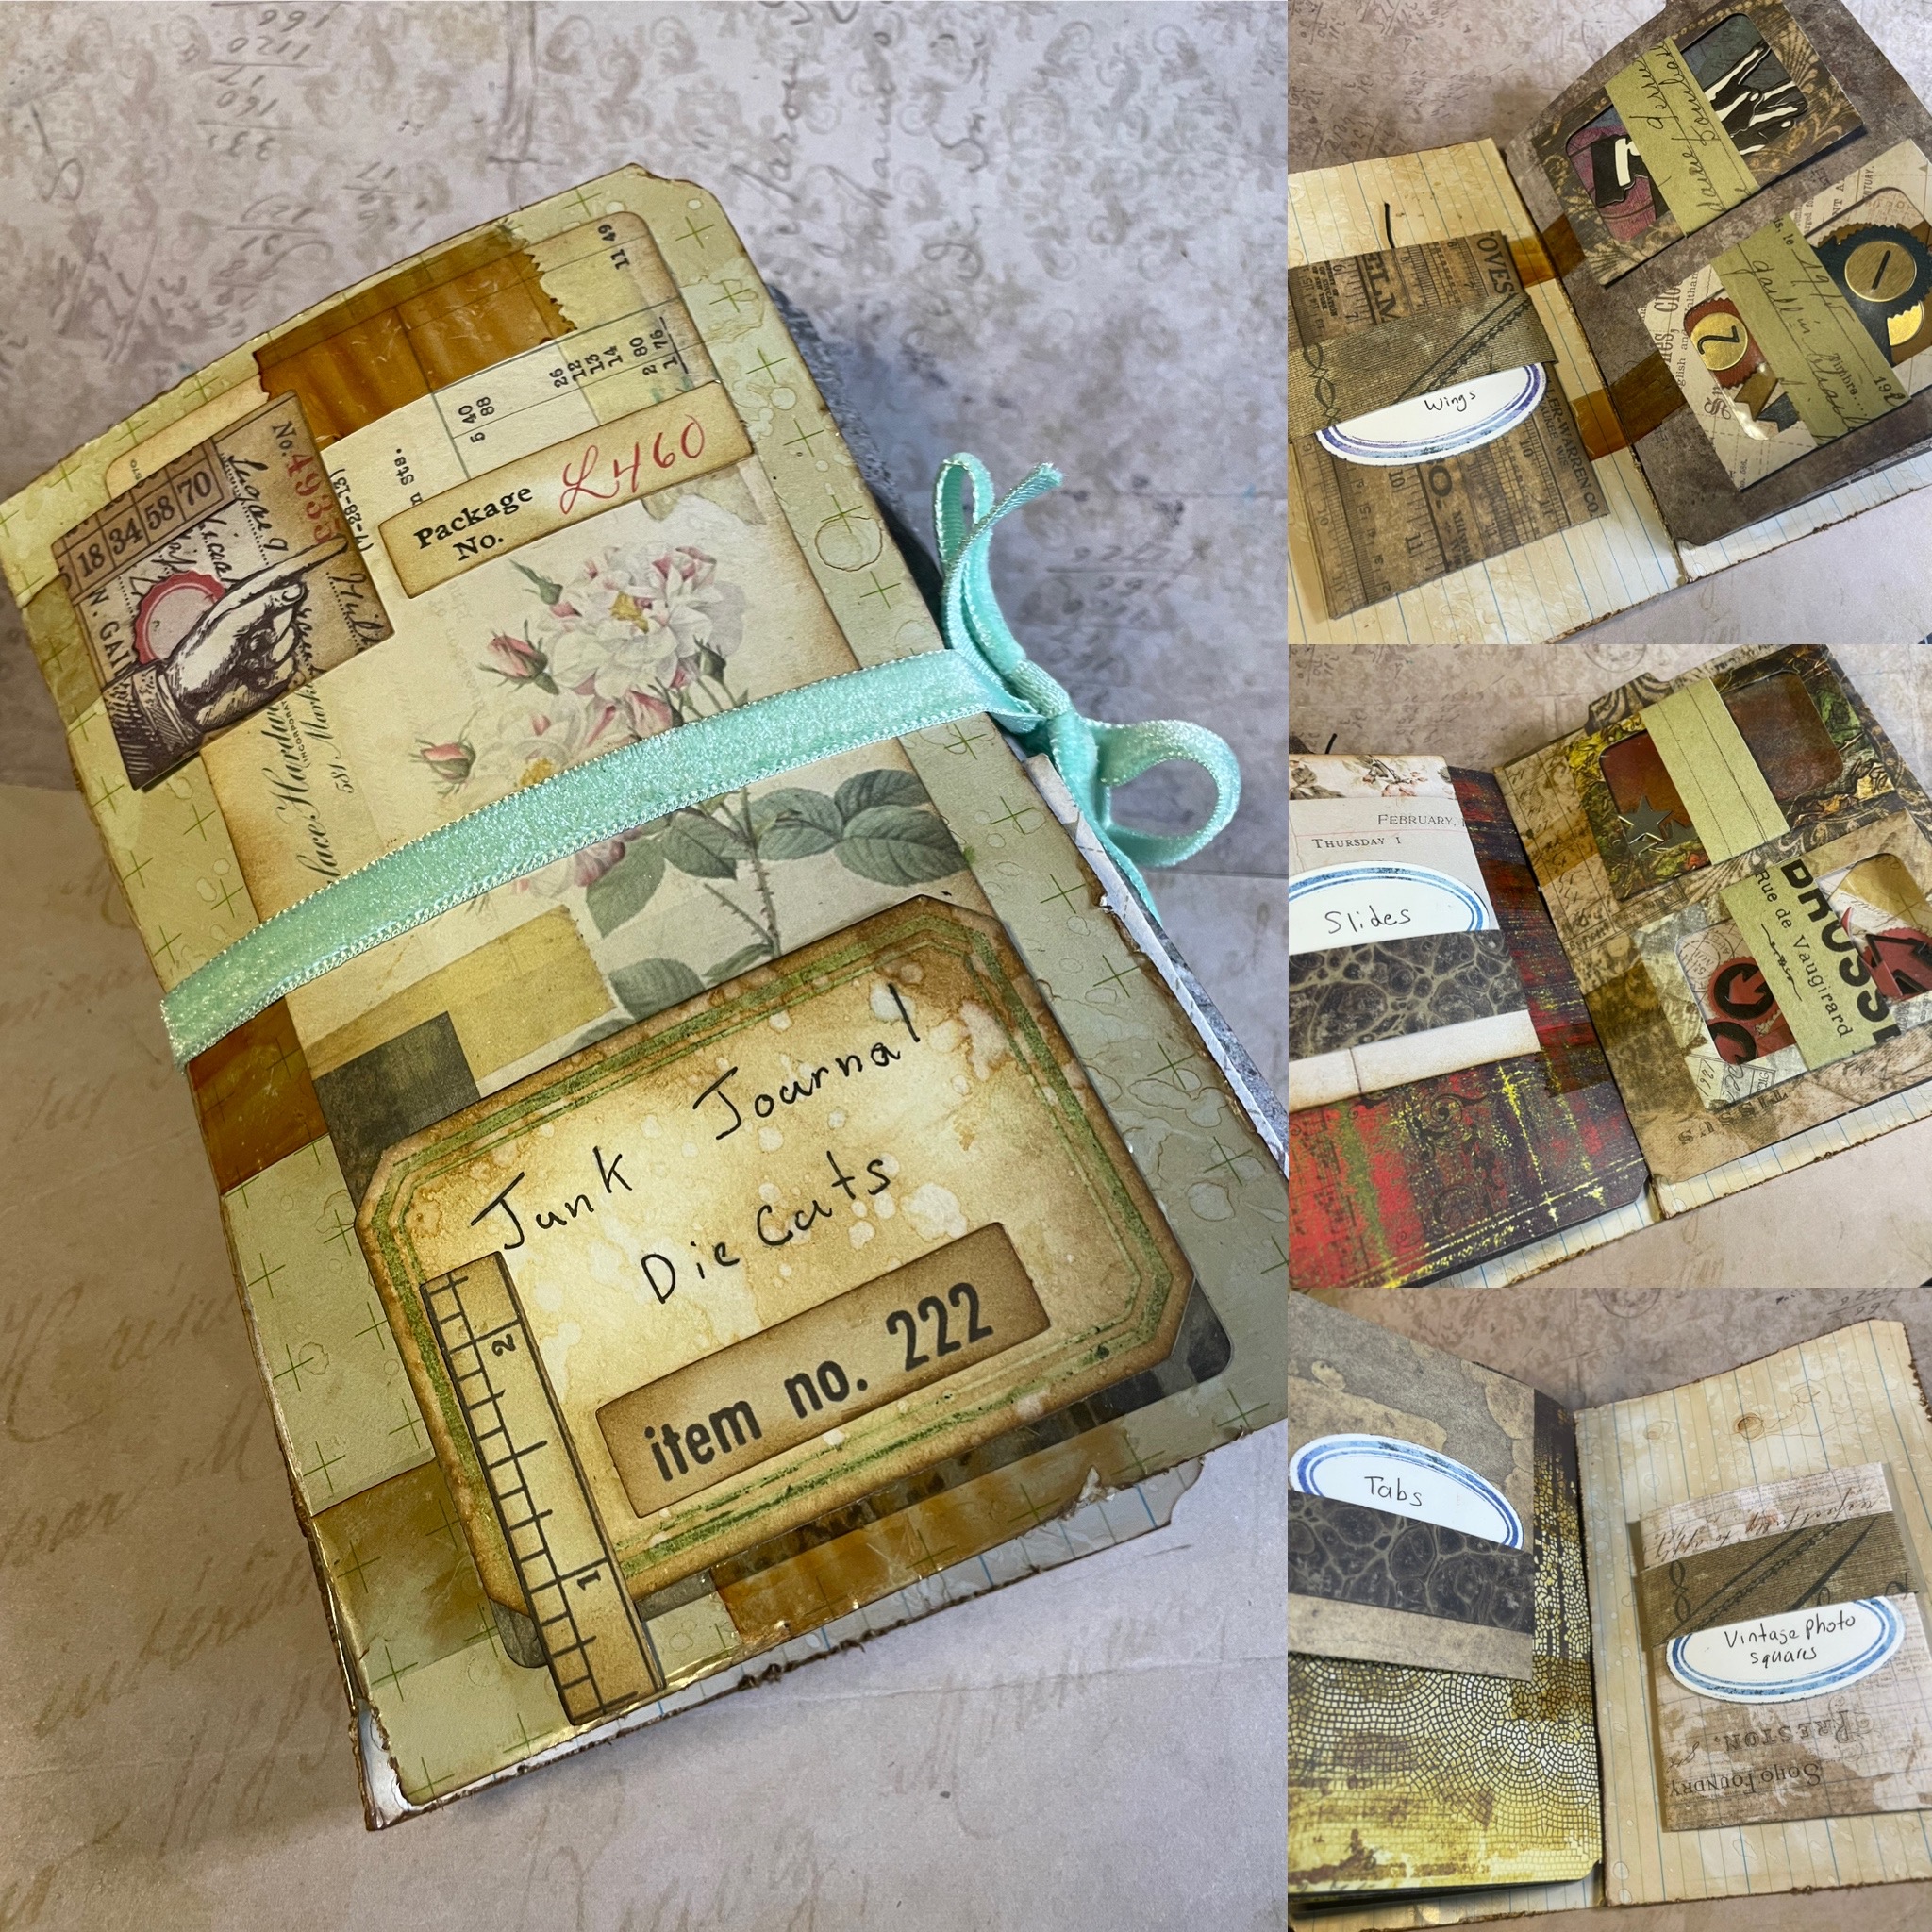
Here is my take on the theme "Scotch it is”. For this week’s challenge I wanted to feature the new Chapter 3 Tim Holtz Sizzix release. Today I am going to be creating a scotch tape tab journal and this journal is going to be used to store many of the fantastic die cuts from chapter 3. With these amazing die sets I have been die cutting things nonstop and since I have all these fantastic die cuts I need a place to store them. Creating a junk journal style book seems like a great storage solution with all of the fantastic pockets and envelopes that can be created. For a video instruction click here.
For today’s project I have decided to feature the Tim Holtz chapter 3 dies. Specifically I’m going to be using the collector and the specimen die sets now before we jump into the project let’s go ahead and do a little bit of die organization. Other materials used: Collage medium, collector, postal, specimen, vintage labels, vintage photo, Distress ink, volume three backgrounds file folders Idea-ology ephemera paper dolls metallic craft stock Idea-Ology velvet ribbon, journal cards, and background volume 3.
Here I decided to place all of my dies on a magnetic square. The square is cut from a floor vent cover.
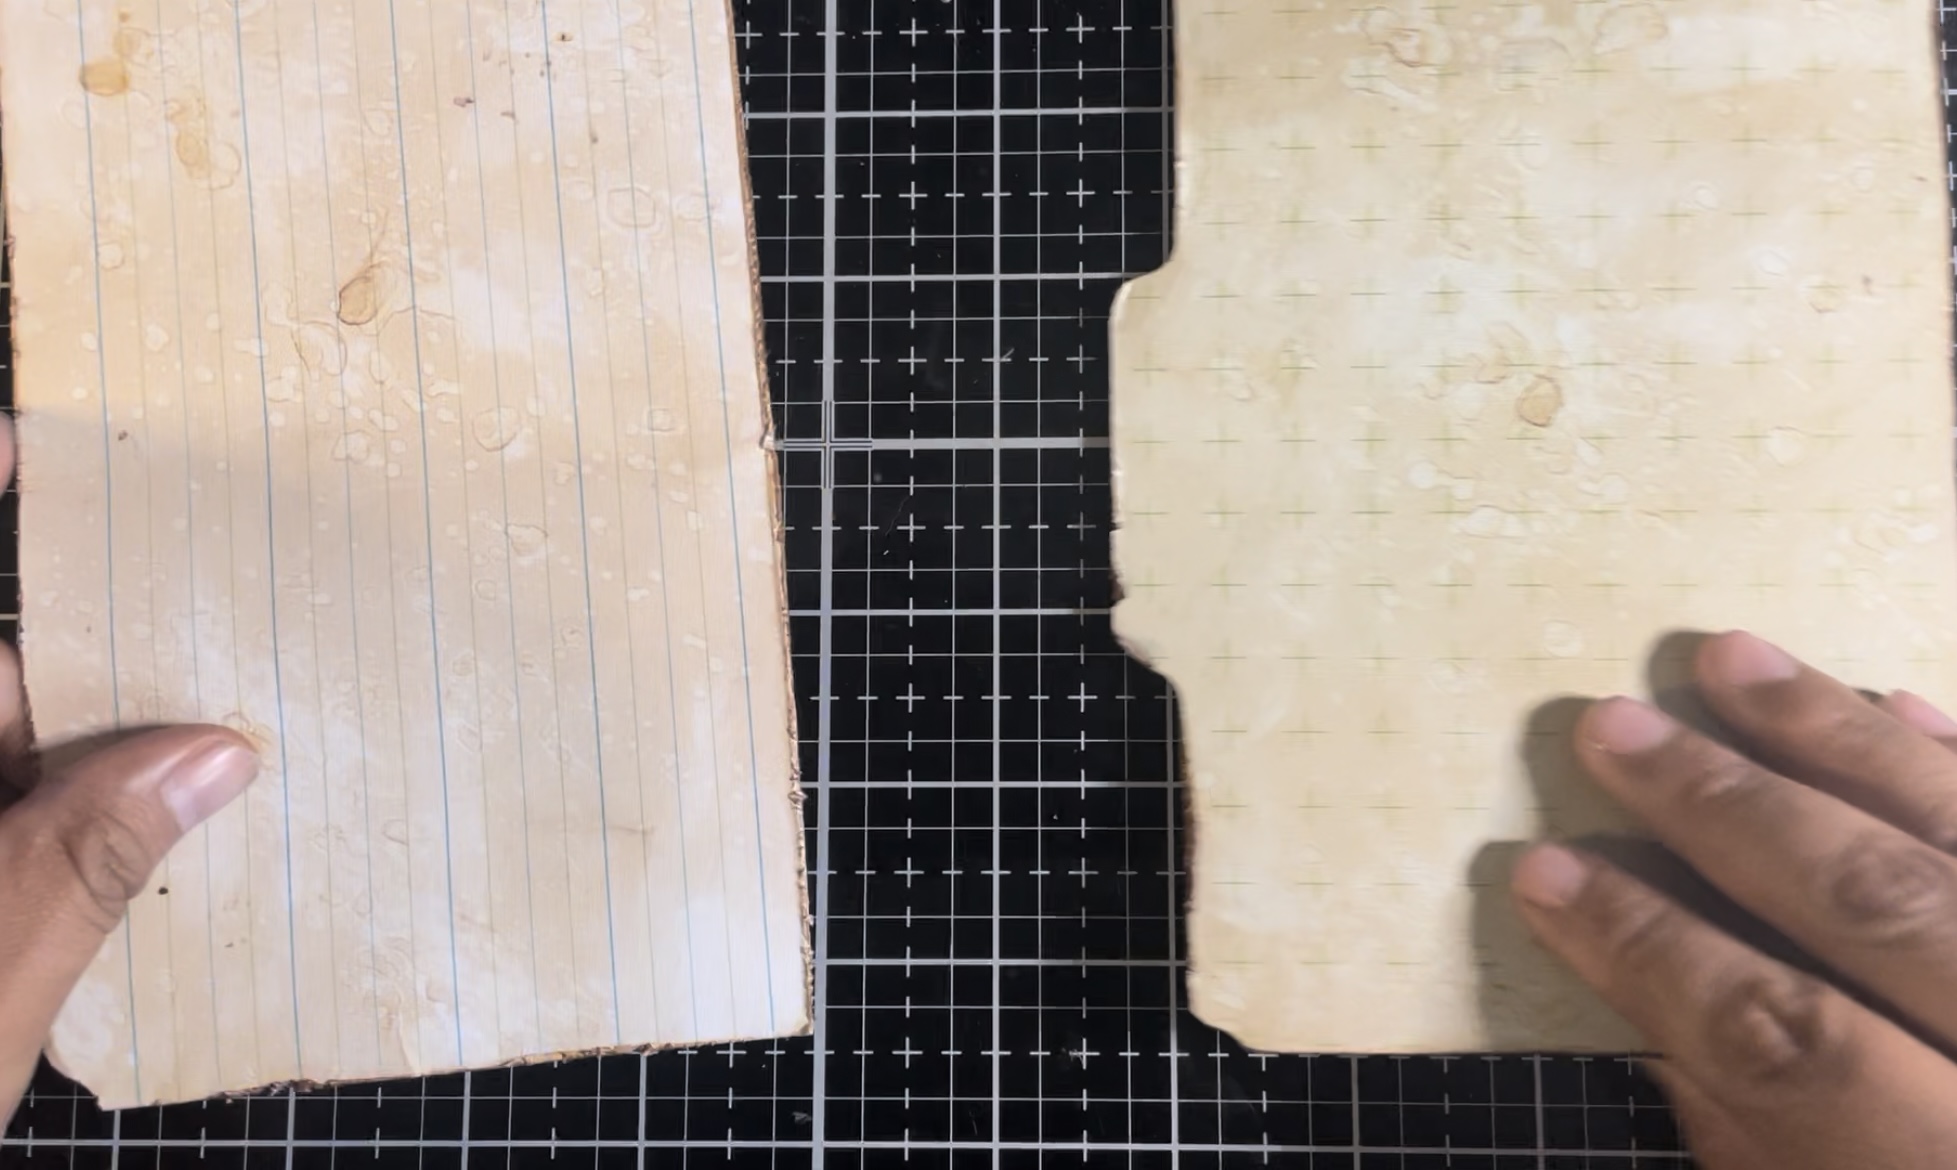
No for our main project. To start the project I decided to use an idea-ology folder this folder I have cut in half. The folder is going to form the cover of our scotch tape to booklet.
Now we are going to cut the pages for the inside of the booklet. For the inside pages I am going to be using a die cut from collector we’re going to be using the folder die. Or our substrate I am using up some different paper packs I am using Tim Holt‘s idea-ology paper abandoned and French industrial. For cutting out these pieces I decided to use the Tim Holtz vagabond and I’m using a traditional sandwich of base plate and thinlet adaptor plate, paper, die cutting plate. Here we have our interior folders, Which we have cut four of.
Onto the Dyke I am cutting off the exterior tab.
These I am replacing with all the tabs using the collector die set.

With our interior pieces completed now we’re going to crunch up the cover of this scotch tape tab booklet. To distress the edges of the file folders I am using the Tim Holtz Paige distresser.
once the edges were distressed then I decided to add some vintage photo Distress ink onto the folders.
After the ink was applied Ayden spritzed with the Distress sprayer to get a speckled look.
Before we start assembling our booklet let’s alter some scotch tape. To start with a place down the Tim Holtz grip mat and then I added pieces of tape.
to alter the pieces of scotch tape I decided to use some sepia alcohol ink and an alcohol ink blending pen.
No let’s add the scotch tape on the cover piece of our booklet I placed three pieces of tape one on the top one on the middle and one on the bottom. These pieces of tape now or turn so that the sticky side is facing up and our cover is facing down. These pieces of tape now or turn so that the sticky side is facing up and our cover is facing down. Next I added two pieces of tape to the second piece of the booklet on this piece I added two sections of scotch tape both partway between the top and the bottom. Next I lay the second piece over the cover of the booklet so that the two pieces of tape were facing upwards.

No comes the tricky part here I took the first three pieces of tape that we had placed down and pulled them over the second piece of paper securing the first and the second piece of paper together leaving two of the sticky tabs free.
For each layer we done repeat this process adding three pieces of tape face up or two pieces of tape face up each time the two pieces that came before or three are the ones that get flipped over and stuck to the sequential page. I found this part of the project to be the most challenging and I highly suggest you check out the video where I go through the steps in real time if you would like to see this part click
here and go to 00:13:31.
.
Now that all the pages are together let’s set this aside and start making some labels. Here I am using the Tim Holtz Sizzix die set vintage labels.
These dice are very unique they have some parts on them that are raised but do not cut through paper these parts are intended for inking. With archival ink and a Distress a brayer I Brainerd on some rustic wilderness archival ink to the die. Then as usual I made my sandwich of cutting plate paper dye and cutting plate and ran it through the sidekick.
Below is an example of how these labels turned out I absolutely love the added touch of archival ink around the edges.

Here I am altering a diecuts envelope first I die cut the envelope and then I cut a window out of the envelope using dies from the die set postal. With a window in the envelope I then added a piece of plastic over the window. This was glued down with some collage medium after I then glued the tops of the envelope together and held it for about 35 seconds. I also added some Distress vintage photo ink around the edges of the envelope.
I also die cut out a bunch of the money envelopes as well. These two were altered with vintage photo Distress Inc. and I also added a closure using string and two of the circular pieces in the die set.
After finishing all of the envelopes I then turn my attention to the cover of the scotch tape booklet to decorate the cover. For the cover I added many different pieces of a camera from idea ology here are used a journal card, collage square, ephemera, and a label.
No let’s turn our attention to the inside of the book. So on the inside I’m going to be placing all of the envelopes and the coin envelopes to do that I’m going to be securing them to each page using a strip of paper this is cut at 1“ x 6“. Take me to super paper I wrapped it around an envelope and then creased the lines. After I placed double-sided sticky tape on the back and then stuck the paper band into the book. For the coin envelopes I decided to place them vertically and for the envelopes with the windows I decide to play Torna page horizontally.
Below is an example of one of the placed envelopes.
To go inside all of these envelopes I have die cut a whole bunch of pieces from the die sets collector, specimen, and postal. I also added some other fun dicots such as the impresslit wings and the switchlit medallions.
To put the finishing touches on this scotch taped up booklet I added a band of velvet ribbon from idea-ology.
No a few folders for a look inside this scotch tape tab booklet.
Thank you so much for joining me here today at the crafty corner. Until next time, we happy crafting!
Janna~ 💕🎨💕
I can also be found on:
Instagram: @treasuresofthesea_jannak
Below are some links for some inspired shopping at the Funkie Junkie.
Sizzix dies: Postal
Sizzix dies: Specimen
Sizzix dies: Collector
Sizzix dies: vintage labels
Distress Ink vintage photo
Idea-ology paper pack volume three
Idea-ology file folders
Idea-ology metallic kraft stock
Distress archival ink prize ribbon
Distress Archival Rustic Wilderness
Distress archival ink villainous potion
Collage medium


Janna this is not only beautiful but also so clever. I never have seen the scotch tape method used before and I love it!
ReplyDeleteThank you so much!
DeleteThis is just WAAAAY too COOL!!!
ReplyDeleteWhen I thought of using Scotch Tape, I only kept thinking along the lines of painting & pulling it off after. 🤪
We have a long-standing argument here: I say “Scotch Tape” is the yellow masking painters tape. He says it’s the clear kind presents are wrapped with.
I only know: we go through a lot of both here, lol!
Your book will get aloooootta looks, to be sure!! KUDOS!!!
Thank you so much! I was quite torn between going for the scotch pattern or the tape.
Delete