TFJ Challenge: Stencil Mania
Hello and welcome to the new Funkie Junkie Challenge! Stencil Mania: Get your stencils out and go a little crazy for this challenge! Use them with inks, paints, glazes, mediums, or whatever else you wish, but use at least three different stencils in your project.
The overall winner will be offered the chance to be a Guest Designer at a future date here at The Funkie Junkie Boutique Blog, and everyone who enters and follows the rules will go into the drawing for the chance to win a $25.00 spending spree at The Funkie Junkie Boutique. There are also Top 3 Badges for three additional outstanding entries, chosen by the Design Team.
The guidelines for entering are simple; create a new vintage or shabby chic project following the challenge theme, link it to your post (not just your blog) and also include a link to this challenge in your post. You can combine our challenge with up to 10 challenges (including this one) to be in with a chance for winning. Don’t forget you can also join the fun through Instagram as well. To enter on Instagram: If you are entering through a public forum (such as Instagram) you'll need to include the words 'Funkie Junkie Boutique Challenge'.

For tutorial and closer look at the new distress color uncharted Mariner click the video down below.
Below are the list of supplies that I will be using to create a card for the stencil mania challenge.

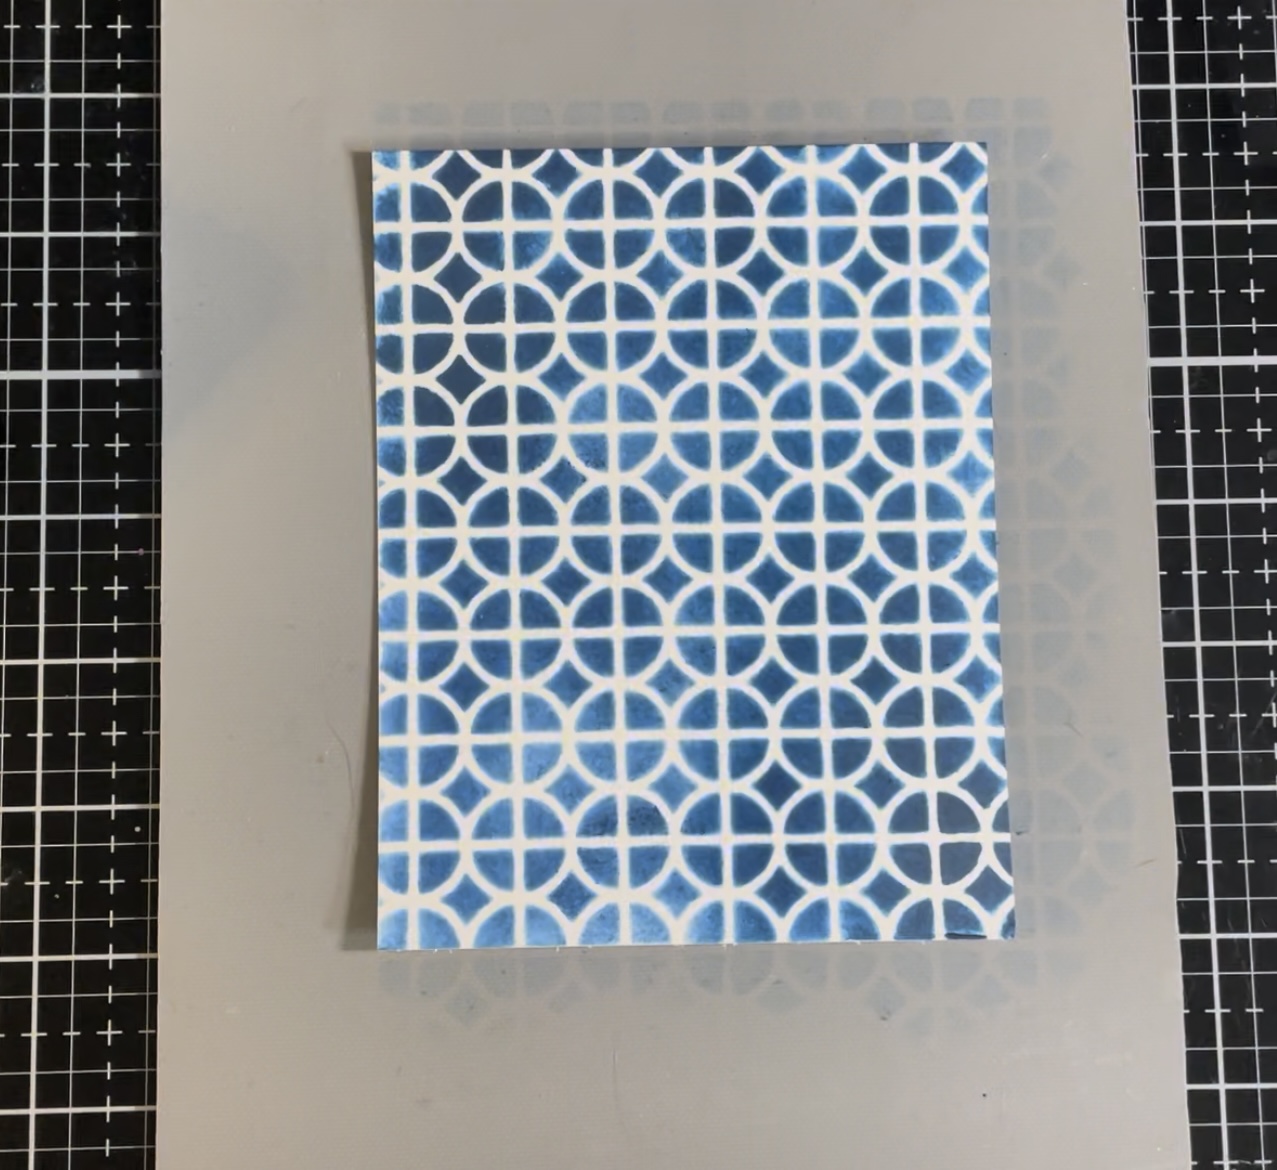
To start with I will be using stencil THS157 for the base layer of my card.

For the first layer I will be doing a basic ink blend with a mini ink blending tool and some dome foam. For ink I will be using distress ink Uncharted Mariner.

For even ink blending I like to start at the edge of the stencil and work in circular motions to get to the middle.
For our next layer I’m going to be using an old technique but using the new distress in uncharted mariner. Here I am crumpling up a piece of mixed media paper. This is going to be the Tim Holtz Technique of crumpled Distress and ironing.

Here I have smoothed out the crumpled paper and I’m gently running the Distress ink pad over the top of the crumpled ridges.

Next I took the distress sprayer and gently misted the paper to allow the Distress ink to wick.

Well the paper’s still wet I then ironed the mixed media paper. This flattened out the ridges from the crinkles and leaves behind an amazing distressed and inky background.

Here is the page completely dried.

Then I added some vintage photo Distress ink around the edges of the paper. To do this I used a distress mini ink blending tool and some dome foam.

Now it is time to assemble our layers. The first layer measures in at 5 1/2 x 4 1/4 inches. For the second layer are used some metallic ideology cardstock that measures at 5 x 3 3/4 inches.

The crinkly layer measures in at 4 3/4 x 3 1/4 inches.

I also added a little bit of additional stencilling on this layer using stencil THMS159.

Here is the finished layered card base.

Next I will be blending with some distress oxide inks. Here I am using crackled pistachio, salvaged patina, and uncharted mariner. Again using the mini ink blending tool I decided to apply the ink in diagonal chunks to this tag. The stencil I am using is THS158.

No that’s place our ink tag into the Tim Holtz stamping platform. For our next technique I’m going to do the layered ink painting and inking technique. In the stamping platform I have some of the gray grip mat that will help hold the tag in place. I also security tag with a couple of the magnets that came with the stamping platform.

For the main focal point I decide to go with a Stamps fresh brewed CMS232. Next we will think of the stamps in distress archival blacks soot.

Now the image didn’t start perfectly but that’s OK I just need a little bit of an outline to give me guidelines for where to add paint. After the paint is dry I will then go back in and do a second step in to add details back onto this picture.

For distress paints I used gathered twinks hickory smoke and uncharted mariner. To apply the pants are used the Tim Holtz ranger find detailer waterbrush.

Now let’s do a second stamping with distress archival ink black soot to bring the details back into the stamp image.
I placed the finished focal point on the layered card base with a few foam squares to give it a bit of added lift.

Now for finishing touches. To finish of this card I added a Idea-ology TH sticker sentiment.
Thank you so much for joining me here today at the crafty corner. Until next time, we happy crafting!
Janna~ 💕🎨💕
I can also be found on:
Instagram: @treasuresofthesea_jannak
YouTube: The Crafty Corner with Janna
Below are some links for some inspired shopping at the Funkie Junkie.
Distress Ink Vintage Photo https://www.thefunkiejunkie.com/Distress_Ink_Pad_Vintage_Photo_TIM19527_p/tim19527.htm
Distress Oxide Ink Cracked Pistachio https://www.thefunkiejunkie.com/Distress_Oxide_Cracked_Pistachio_TDO55891_p/di_tdo55891.htm
Distress Oxide Ink Salvaged Patina https://www.thefunkiejunkie.com/Distress_Oxide_Ink_Pad_Salvaged_Patina_TDO72751_p/tdo72751.htm
Distress Oxide Ink Uncharted Mariner https://www.thefunkiejunkie.com/Distress_Oxide_Ink_Pad_Uncharted_Mariner_TDO81890_p/tdo81890.htm
Distress Paint Hickory Smoke https://www.thefunkiejunkie.com/Ranger_Tim_Holtz_Hickory_Smoke_Paint_TDF50223_p/tdf50223.htm
Distress Paint Uncharted Mariner https://www.thefunkiejunkie.com/Distress_Paint_Uncharted_Mariner_TDF81913_p/tdf81913.htm
Tim Holtz Stencils THS157 https://www.thefunkiejunkie.com/Tim_Holtz_Layering_Stencil_Linked_Squares_THS157_p/ths157.htm
Tim Holtz Stencils THS158 https://www.thefunkiejunkie.com/Tim_Holtz_Layering_Stencil_Focus_THS158_p/ths158.htm
Tim Holtz Stencils THMS159 https://www.thefunkiejunkie.com/Tim_Holtz_Mini_Layering_Stencil_Set_52_MST052_p/mst052.htm
Distress Archival Ink Black Soot https://www.thefunkiejunkie.com/Tim_Holtz_Mini_Archival_Ink_Pads_Kit_3_AITK64848_p/ai_tank64848.htm
Fine Detailer Ranger TH water brush https://www.thefunkiejunkie.com/Tim_Holtz_Water_Brush_Detailer_Brush_Nib_TIP33080_p/wbdetail.htm


Comments
Post a Comment