TFJ Challenge: Reuse & Upcycle
Hello and welcome to a new Funkie Junkie Challenge!
Reuse & Upcycle: Ready for some spring cleaning? Try using something that would end up in the trash as part of your creative project! Upcycle thrift store finds, use your junk mail or product packaging in creative and 'arty' ways. Let's see what you can do with "trash".
The overall winner will be offered the chance to be a Guest Designer at a future date here at The Funkie Junkie Boutique Blog, and everyone who enters and follows the rules will go into the drawing for the chance to win a $25.00 spending spree at The Funkie Junkie Boutique. There are also Top 3 Badges for three additional outstanding entries, chosen by the Design Team.
The guidelines for entering are simple; create a new vintage or shabby chic project following the challenge theme, link it to your post (not just your blog) and also include a link to this challenge in your post. You can combine our challenge with up to 10 challenges (including this one) to be in with a chance for winning. If you are entering through a public forum (such as Instagram) you'll need to include the words 'Funkie Junkie Boutique Challenge'. Also, please turn off your Word Verification so our Design Team can leave comments on your blogs. Make sure you follow these rules as unfortunately, we have had to eliminate entrants from the prize drawing in the past.
For my take on this theme I will be creating a mini junk journal. For process video click here.

For this project I have scrounged some supplies from the recycling bin and I have pulled pieces from my scrap drawer. One of my goals this year is to use my stash so I am also pulling from my stash of worn wall paper and backgrounds. For the cover so am using some recycled cardboard. Other recycled materials include: plastic packaging, Distress product packaging, and scrap paper.
Used: Tonic Scissors, Tim Holtz Paper Trimmer, collage medium, Idea-ology Flash cards, Idea-ology journal cards, Idea-ology paper pack 3, worn wallpaper,

To start this recycle upcycle project my first stop was the recycling bin. In it so found an Amazon box that I could cut up and make into a cover for the junk journal.

Next I raised my craft room recycling bin and found a stash Tim Holtz packaging. I also pulled out some plastic sleeves. In addition I also went through my scrap drawer and pulled out some large scraps to create with.

To make the book cover I measured and cut the cardboard to 6in x 4.5in. For the spine of the book I cut another piece at 6in x .75in. For measuring I used the media mat and the TH tonic strait edges.


On the inside I used some paper from Idea-ology paper set 2.

While letting the book cover dry I then started to punch holes at the top and bottom of the spine to add elastic cord that will hold the signatures in place. I punched two holes using an awl about a quarter of an inch apart.

Then I threaded some elastic black thread that I cut two pieces of at 14in. Next I tied the ends off using two over hand knots.


Setting the spine aside I the. Started folding papers in half to make signatures. For pages that were blank on one side I glued down pieces of packaging. I folded about 6 pieces of paper per signature before stacking the parts together.

Once all the signatures were stacked I then used an awl to make four little holes to push staples through. For staples I used some of the tiny attacher staples.

Next I added some Idea-ology corners to the book covers. On the inside of each corner I added a little collage medium.

Then flipping the cover over I used chain nose jewelry pliers to pinch down the corners of the decorative corner tabs.

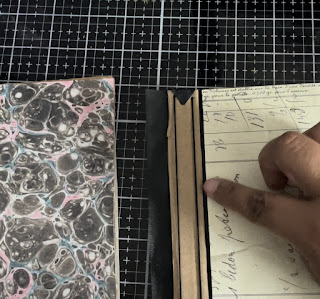


Here I am attaching the spine of the book to the two cover pieces. Using the book tape I lined up each cover piece with the spine leaving about a 1/8in gap. The gap is needed so the spine can bend.

With the spine attached I then added a second piece of book binding tape to the inside of the cover to add some reinforcement.

Now the fun part! Adding the signatures. To add the signatures I lifted up the elastic bands and slipped one signature under each band. The elastic goes in the middle of the signature.

For finishing touches I added a sentiment and some washi tape to the cover. For the sentiment I added an Idea-ology flash card. This completes the making of the junk journal.


Below are some pages I collaged. To see the collage process check out the junk journal process video. Click here.


Janna~ 💕🎨💕
I can also be found on:
Instagram: @treasuresofthesea_jannak
YouTube: The Crafty Corner with Janna
Below are some links for some inspired shopping at the Funkie Junkie.
collage medium
Idea-ology Flash cards
Idea-ology keys
Idea-ology pocket cards
Idea-ology paper pack 3
Idea-ologyworn wallpaper
https://www.thefunkiejunkie.com/Tim_Holtz_Idea_ology_Worn_Wallpaper_Scraps_TH94122_p/ido_th94122.htm
Idea-ology paper dolls


Wholeheartedly; I ADORE THIS!!!!!
ReplyDeleteBy now, you know I sorta like Tim Holtz stuff, lol, and that means this BEAUTIFUL Junk Journal is a true hit for me!!! 👏👏👏
Thank you so much! Any reason to dig into my Tim Holtz stash makes for a fun creative play time.
DeleteGreat junk journal, with those Paper Dolls all dolled up and fun to see you use those TH package backs to make this. I'm planning another project using those 'tags' I've been hoarding for a very long time. I recently went through all my 'trash' and disposed of almost everything in plans for a downsize, but I've kept my TH package backs! Hope I can find some crafty time.
ReplyDeleteThank you so much! I love projects that help use up the stash. It is amazing as crafters what we accumulate. I am moving in the next two months or so and have been reorganizing and desperately trying to use the stash. I love that I'm not the only one who keeps the TH packaging.😊
DeleteStash buster projects are the best! I love your little junk journal Janna. =)
ReplyDeleteThank you so much! I love a good junk journal to stash those crazy popcorn ideas that always pop up during Tim Holtz lives.
Delete