Funkie Junkie: Festive Fun
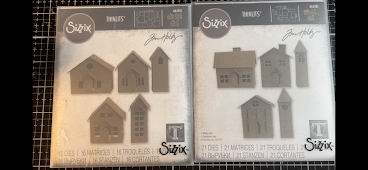
Hello and welcome back! Today over at the Funkie Junkie Challenge blog the DT is putting together a festive showcase to share some projects and inspiration with you. I have decided to create with the Tim Holtz Sizzix die sets Paper Village 1 and 2 to make a gingerbread village.

Here I have turned a combination of paper village houses a gingerbread mansion. For video instruction click here for part 1. Below are the materials I used for the basic construction of the gingerbread mansion. Used: Paper village die sets 1 and 2, die set village dwellings (cathedral window framed and outline and cottage shingles die, walnut stain distress ink, collage medium, distress glitter, remnant rubs metal tool, vellum, and hot glue gun. For parts 2 and 3 of this tutorial and demo click here for 2 and here for 3.
Here are the window pieces that I used in addition to paper village die cuts.

For die cut pieces I used kraft heavy sock paper as a foundation to cut: 4 tower pieces from set 2, 2 pieces for the long house in set 2 and matching roof pieces, 2 square house segments and a roof from set 1.


After I cut four sets of shingle pieces for roofing.


Now is is time to assemble the houses. For assembly I like to use hot glue. Other options for assembly could include double sided tape or collage medium. The only downside to collage medium is that it will take longer to dry.

Here is the assembled base of the long house from set 2.

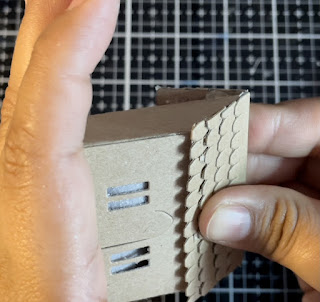
For the towers I pre cut out a cathedral window before assembly. Again I used hot glue to assemble the two die cut pieces together.

Then I folded up the roof for the tower and glued that too.

With the tower assembled I decided to add some frosted windows. To do this I cut down some scraps of vellum it behind the window frame.


Next I glued down the roof shingles for the roofs. For the long house it took 8 strips of roofing shingles to cover the whole roof. The squad building’s roof took 4 strips each cut in half.


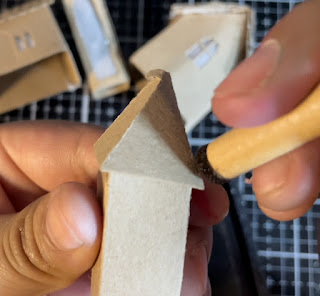
Then I held the roof on for a few seconds to make sure it was secure.

Then I glued the tops of the towers on.

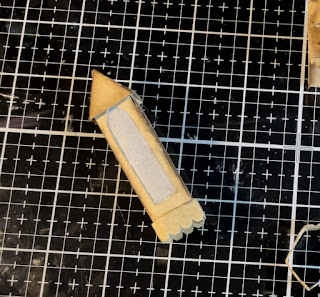
Before getting into assembly I added a small riser to give the tower a bit of extra hour. To do this I used a piece of the roofing shingles.
With all the buildings constructed I then added some highlights with some distress ink walnut stain.


Part 2 Decorating the Ginger Manor. For the next part of this tutorial we will be altering some Idea-ology bubbles and baubles.

To color these I added equal portions of the beads and baubles into three cups. I then used crimson to color the ones below. I colored the other two batches with boysenberry and glacier.

Now comes my favourite part, frosting the building. To do this used a silicone cake decorating frosting syringe. I like these because they are reusable and easy to clean.

To load it I used a Ranger pallet knife and some distress texture paste. By taking small scoops I was able to smoosh the texture paste into the tube and scraping it along the side.

Once filled about 2/3 of the way full I then used the plunger to tamp down the distress texture paste. For the nozzle I used the mini star frosting tip.

Before we start frosting this gingerbread mansion let’s first talk a little about technique. If you have ever frosted a cake or cookies this mint sound familiar. The basic way to frost an item is to make a strait line with the frosting. Push on the plunger and draw slowly in a strait line.

The other way I will apply frosting will be to make a snail trail. To do this I am pressing lightning on the plunger and wobbling the frosting top up and down in a rocking motion to create some frosted ruffles. See video for close up details. Click here. See section 0:7:15

The sections of the houses that I most often use the snail trail on are the roof peaks and along the bases of the houses.

Below I have frosted all of he edges of the building. I also used a snail trail on the eves of the house.

With all the frosting in place I then started to add on the colorful bubbles and baubles. These I placed in the frosting while it was still wet in order to get the embellishments to stick.

With the front of the manor completed and dry, dry time took about 30min. I then frosted the back of the manor and added some baubles to the tops of the towers.

Here is the finished gingerbread manor.

Part 3 Gingerbread Village Table Décor Assembly:
To start the assembly process I will first be altering some sticks. These we collected out in the field when I cut down a birch tree for this project. Click here for video.

I will be Turing these sticks into some frosted trees. To do that I spread some collage medium onto the sticks with my fingers. (Using a brush would work well too)

Then I used a glitter duster to sprinkle on some distress rock candy glitter. Once the sticks were glittered I set them aside to dry for about 20mim.

Here is a white birch slab that I cut and will serve as a foundation for our gingerbread village. For the extreme crafting video click here.

To start this decor piece I used some hot glue to attach the gingerbread mansion to the birch slab. I also used some cotton balls to help prop up the house since the wood foundation was uneven in some areas.


Once all the houses were glued down I then took a .25 drill bit and drilled out some holes to put sticks into to make trees. In total I drilled eight holes.


Here is the finished gingerbread village. For finishing touches I sprinkles some glitter over the cotton ball snow while the collage medium was still wet.

Thank you so much for joining me here today for some crafty fun. Happy crafting!
This project was inspired by the theme of Cold as Ice for the weekly Simon Says Stamp Monday challenge. Creating icy cold snowdrifts with cotton balls and icing (frosted) gingerbread houses with sparkling distress glitter.
Here are some close up photos of the village.


Inspired shopping
Paper Village 2
https://www.thefunkiejunkie.com/Tim_Holtz_Die_Set_Paper_Village_2_665585_p/die_665585.htm
Village Dwellings
https://www.thefunkiejunkie.com/Thinlits_Die_Set_Christmas_Village_87pk_665564_p/die_665564.htm
Distress Paint picket fence
https://www.thefunkiejunkie.com/Tim_Holtz_Distress_Paint_Picket_Fence_TDF53170_p/tdf53170.htm
Distress paint candied apple
https://www.thefunkiejunkie.com/Tim_Holtz_Distress_Paint_Candied_Apple_TDF51046_p/tdf51046.htm
Distress Glitter Clear Rock candy
https://www.thefunkiejunkie.com/Tim_Holtz_Dry_Glitter_Clear_Rock_Candy_3oz_TDR3587_p/tdr35879.htm
Idea-ology baubles
https://www.thefunkiejunkie.com/ProductDetails.asp?ProductCode=TH94099
Ornate Gates
https://www.thefunkiejunkie.com/Idea_ology_Ornate_Gates_Halloween_2021_TH94159_p/ido_th94159.htm
Collage medium
https://www.thefunkiejunkie.com/Distress_Collage_Medium_Matte_2oz_Bottle_TDA73031_p/tda73031.htm
Pallet knife https://www.thefunkiejunkie.com/ProductDetails.asp?ProductCode=TDA75141
Texture paste
https://www.thefunkiejunkie.com/Distress_Texture_Paste_3oz_Matte_TDA71297_p/tda71297.htm
Kraft heavy stock
https://www.thefunkiejunkie.com/Tim_Holtz_Distress_Kraft_Heavystock_TDA76384_p/tda76384.htm


This is such a wonderful project! It's amazing to see all the work that went into it, but I bet you were loving every single minute. And what a fabulous display with so much attention to detail! Thank you for sharing and Merry Christmas!
ReplyDeleteThank you so much!🌲❤️🌲
Delete