Hello and welcome to a new challenge for the Funkie Junkie Challenge Blog. This week we want to challenge you to create Holiday Tags for us! Now is the time to be sure you have enough holiday gift tags. Show us your best festive holiday tag!
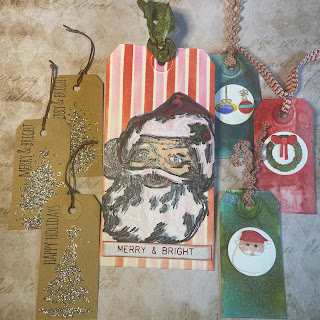
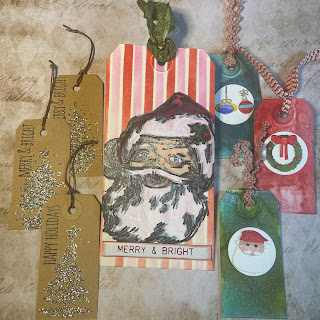
For this new challenge I have created two sets of quick and easy mini tags, and one large tag with some stamping and stenciling. Let’s get started with some stamping, stencilling, and spritzing. For instructional video click here.
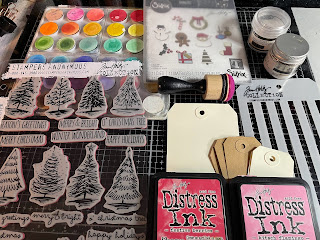
To create these tags I used: the Sizzix Christmas Minis die set, distress paint dried marigold, picket fence, festive berries, and rustic wilderness, distress ink kitsch flamingo and festive berries, distress reinkers tattered rose , festive berries, rustic wilderness, mustard seed, salty ocean, salvaged patina, and blueprint sketch, CMS249 Scribble Christmas and Jolly Santa CMS442, distress archival black soot, distress glitter tinsel, Ranger sticky embossing powder, distress embossing ink, THS002S shifter stencil.
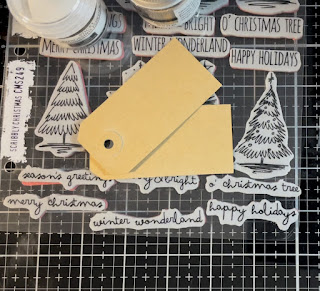
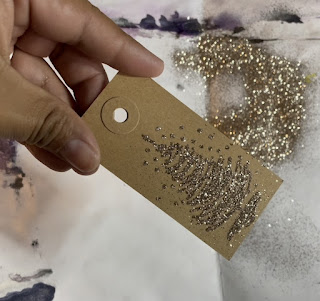
This time of the year is super busy so I have put together two sets of quick and easy tags. This first set features stamps from the Scribble Christmas stamp set on mini kraft tags.
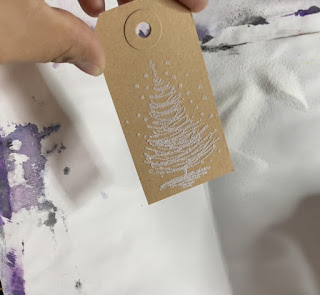
To start I stamped with distress embossing ink and then sprinkle on some sticky embossing powder.
For the next step I highly recommend getting all your materials ready in advance. Sticky embossing powder dries very quickly so it is much easier to have the jar of glitter open and ready to pour as soon as the embossing powder starts to get melted. I used tinsel distress glitter for this tag set.
Once the glitter is on the tag take a soft brush and gently brush off the extra glitter.
To finish off the stack I added a small little sentiment from the steps at scribble Christmas in distress black archival soot.
For our next set of tags I decided to use the new Tim Holtz Christmas Minis die set.
To make this project goes smoothly I pre-cut some heavy distress white card stock into small pieces that fit neatly into the sidekick. I also added some double-sided adhesive to the pre-cut pieces of paper to make the die cut assembly easier. Then I placed dies down on some sticky grid paper before die cutting.
Two colour is diecuts I decided to use some distress reinkers. When using stress-free increase I like to use them in the Tim Holtz Ranger pallet. I don’t water coloured the die cut pieces with Distress reinkers to add some color.
Now let’s assemble our die cut pieces. For each of these little diecuts I decided to mount the finished piece is on a circle of paper. For the ease of assembly I also used the Sizzix die pick to help me pick up some of the smaller die cut pieces.
For the tags I decided to add some spritz and sparkle with some of the Tim Holtz Distress mica spray stains. For these colours I used holly berries, tree lot, snowfall, frosted juniper, peppermint stick, and winter berry. For the tags I spritzed the tags with water and then added some distress mica sprays and dried with the Ranger heat tool.
To finish these tags off I added some Idea-ology trimmings.
For our final tag I decided that I wanted to play around with the new shifter stencils. For ink so I decided to use kitchen Flamingo and Festive berries.
I decided to apply the Distress inks with some dome foam. To keep the stencil for moving I taped it down with a little bit of washy tape on the back of the tag and as a hinge on the stencil.
Next I got out the Tim Holtz stepping platform in order to put down my first layer For the stamp and pain layer technique. Here I decided to use the Jolly Santa stamp set and I stamped with distress archive all black soot.
Once the image was stamped I the colored the image in with different distress paints. Before painting I did seal the area with micro glaze to prevent bleeding from the distress inks. The paints a used included dried marigold, picket fence, festive berries and rustic wilderness I applied these pains with the Ranger water brush.
Once the paint was dry I then stamped again with the Distress archival black ink in order to bring back the details of the stamp.
For some finishing touches I decided to add some crinkle ribbon to this tag. To colour the ribbon are used some of the Distress mica spray stain tree lot.
For sentiment a used one of the Idea-Ology quote chip. I inked the edges of the quote chip with some festive berries ink before glue it to the tag with some distress collage medium.
Below is the finish tag.
I hope that you’ve enjoyed these quick and easy tags as well as a more in-depth look at a tag with the paint and stamp layering technique.
Thank you for joining me here today and until next time happy crafting!
~Janna💕🎨
Want to check out some supplies from this tutorial? Bellow are some links for inspired shopping at the Funkie Junkie.
Christmas Minis
Sticky embossing powder
Distress Reinkers Tattered Rose
Distress Reinkers Festive Berries
Distress Reinkers Salvaged patina
Distress Reinkers Blueprint sketch
Distress Reinkers Barn door
Distress Reinkers Pumice stone
Distress ink kitsch flamingo
Distress ink Festive berries
Shifter Stencils set 2
Stamp set CMS442 Jolly Santa
Distress paint dried marigold
Distress paint festive berries
Distress paint speckled egg
Tags mixed media


Lovely set of tags! I love how some of them are quick as we always need last minute tags for goodies!
ReplyDeleteFabulous set of festive tags!
ReplyDeleteWow, what a great variety of tags! I love those glittery ones the best!
ReplyDelete