Living Things:TFJ Challenge

Hello and welcome to a new challenge over at the Funkie Junkie blog.For this challenge the inspiration is animals or any type of living creature that you want to feature on your art!  This will showcase our love for our pets, animals and/or our insect friends! Include a photo, stamped image, embellishment or pattern paper of a living creature in your art. 

To join the challenge head over to the Funkie Junkie Blog for the challenge rules and ways to enter.


For the living things challenge I wanted to feature one of my favourite colorize die sets, Harrison the lion. With this die set I decided to make a jungle themed birthday card. We will also be looking at ink blending with my new favourite Distress  color combination: chipped sapphire, prize ribbon, villainous potion, and kitsch flamingo.  If you would like to see the process video click  here.

Here is the materials list for today’s project: Sizzix Harrison colorize, leaf fragments, from the vault Halloween,  3D leaf embossing folder, and leafy twigs thinlit, Distress ink chipped sapphire, prize ribbon, villainous potion, and kitsch flamingo, distress pearl crayons bubbling cauldron, tree lot, and holly branch, distress crayon pine needles, distress mica spray stain flickering candle, collage medium, Idea-ology word label, distress sprayer, Distress reinkers fossilized amber, kitsch flamingo, and oxide frayed burlap


To start this card I began with a foundation of distress white heavy stock and some ink blending. I decided to go for a bit of an ombré effect. For blending I used kitsch flamingo, prize ribbon, chipped sapphire, and villainous potion.

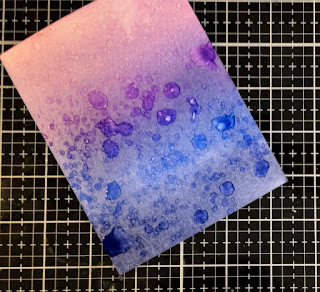
To blend I used a mini pleading tool and some some foam. Started light with kitsch flamingo and then faded into villainous potion. Then blended prize ribbon next with chipped sapphire at the bottom.

Once everything was blended I decided to create some drip drops with the distress sprayer. Then dried off the water with the Ranger heat tool.

Next I spritz some droplets of flickering candle distress mica spray stain onto the background and dried it.
For this card I wanted to go for a layered look. Using some of the Idea-ology black Kraft stock I die cut a panel of leafy twigs to go in the background. Before die cutting I used double sided adhesive tape on the kraft stock.

With the background complete I wanted to make some leafy embellishments. To do that I used some of the new TH pearlized distress crayons. 
To help the crayon move I first covered  a piece of distress watercolor paper with some distress collage medium.
Once the collage medium was dry I then scribbled distress crayon I got he paper. For colors I used tree lot, bubbling potion, and holly berry.

Then I smushed the crayon around on the paper, blending it with my fingers

After smooshing around the crayon I die cut some leaf fragments out of  the paper. For added interest I also ran the die cut leaves through the leaf 3D embossing folder.

Then To highlight the leafy texture I smudged some pine needle distress crayon over the top of the embossing.
For the main focal point of the card I decided to use the Harrison colorize die set. To start I die cut about half of the pieces from the warm colours cardstock set and die cut some on plain distress heavy card stock. For some of the pieces I decided to colour them with some of the Distress reinkers. Dor the reinkers I used kitch flamingo brushed corduroy, vintage photo, and blacks soot.


With all the pieces coloured I’ve been assembled Harrison. This process was really easy because prior to diecutting I added double-sided adhesive tape to all of the papers that I was diecutting this makes for super easy assembly.

With assembly completed item please Harrison in the centre of this card.
Here I decided to add some leafy green leaves around the edge of the card. I added foam squares on the back of the leaves to give them some more dimension.
Here I am cutting off the over hand of extra leafy pieces.
At first I thought I’d only add the leaves on the bottom and the sides but I decided I wanted to add leaves all the way around the card.
The last elements I added to this card were a better and an Idea-ology word sticker.

Thank you for joining me here today and until next time happy crafting!

~Janna💕🎨


Want to check out some supplies from this tutorial? Bellow are some links for inspired shopping at the Funkie Junkie.

Collage medium https://www.thefunkiejunkie.com/Distress_Collage_Medium_Matte_2oz_Bottle_TDA73031_p/tda73031.htm

Colorize Harrison https://www.thefunkiejunkie.com/Tim_Holtz_Thinlits_Dies_Harrison_Colorize_665218_p/die_665218.htm

From the vault Halloween https://www.thefunkiejunkie.com/Thinlits_Dies_Vault_Series_Halloween_2021_665563_p/die_665563.htm

Leafy twigs https://www.thefunkiejunkie.com/Tim_Holtz_Die_Set_Leafy_Twigs_665436_p/die_665436.htm

Leaf fragments https://www.thefunkiejunkie.com/ProductDetails.asp?ProductCode=DIE_665559

Distress crayon pine needles set 9 https://www.thefunkiejunkie.com/Tim_Holtz_Distress_Crayons_Set_9_TDBK51794_p/tdbk51794.htm

Pearlescent distress crayons Halloween set 2 https://www.thefunkiejunkie.com/Halloween_Pearlescent_Crayon_Set_2_TSHK47766_p/tshk77466.htm

Pearlescent Distress crayons set 1 Christmas https://www.thefunkiejunkie.com/Holiday_Pearlescent_Crayon_Set_1_TSHK48258_p/tshk78258.htm

Pearlescent Distress crayons set 2 Christmas https://www.thefunkiejunkie.com/Holiday_Pearlescent_Crayon_Set_2_TSHK48265_p/tshk78265.htm

Distress ink villainous potion https://www.thefunkiejunkie.com/Distress_Ink_Pad_Villainous_Potion_TIM78807_p/tim78807.htm

Distress ink chipped sapphire https://www.thefunkiejunkie.com/Distress_Ink_Pad_Chipped_Sapphire_TIM27119_p/tim27119.htm

Distress ink kitsch flamingo https://www.thefunkiejunkie.com/Distress_Ink_Pad_Kitsch_Flamingo_TIM72591_p/tim72591.htm

Distress ink prize ribbon https://www.thefunkiejunkie.com/Distress_Ink_Pad_Prize_Ribbon_TIM72669_p/tim72669.htm

Dome foam https://www.thefunkiejunkie.com/Ranger_Mini_Domed_Ink_Blending_Foam_IBT77176_p/ibt77176.htm

Word labels https://www.thefunkiejunkie.com/Idea_ology_Label_Stickers_Sentiments_TH94142_p/ido_th94121.htm


Comments

  1. Fantastic tutorial for a wonderful project Janna! I love how you've framed your 'scary' lion with the leaves x

    ReplyDelete
  2. Fantastic birthday card! Love the layers behind the handsome lion!

    ReplyDelete

Post a Comment

Popular posts from this blog

Hippity Hoppity Easter Card

Grunge, Ghouls, or Giggles: TFJ Challenge

Time Shows Us What Really Matters: TFJB Challenge