Hello and welcome! I am so excited to have recently become a design team member for The Funkie Junkie Boutique. This week I am please to announce The Funkie Junkie Boutique will be hosting a creative challenge on their challenge blog to the them "Anything Goes. I greatly look forward to seeing your creative makes over at The Funkie Junkie Blog.
The Design Team will choose their three top picks, and the overall winner will receive the $25 gift certificate to go on a spending spree at The Funkie Junkie Boutique. All four top picks will receive badges to display on their blogs in recognition of their outstanding contributions. Be sure to stop over to the blog to see all the details of the challenge. While you're there check out the fantastic creations my talented teammates made to inspire you!
Here is my take on the theme "Anything Goes". I decided to dive into my collection of Tim Holtz supplies to create this vintage inspired, grungy, glitzy card. You can also access a video demo over on YouTube:
Here are the supplies you will need for this project. Used: tattered florals bigz die by Sizzix, brushstroke flowers 2 and 3, grit paste, collage medium, salvaged patina distress glaze, salvaged patina distress ink, vintage photo distress ink, distress, glitter, alcohol ink cobalt, glacier, monsoon, alcohol ink blending solution, Yupo paper, Ranger alcohol ink blower tool, TH stencil THMS036, Ranger pallet knife, Ranger heat tool, TH French Industrial paper pack, piece of scrap paper to catch distress glaze and distress glitter.
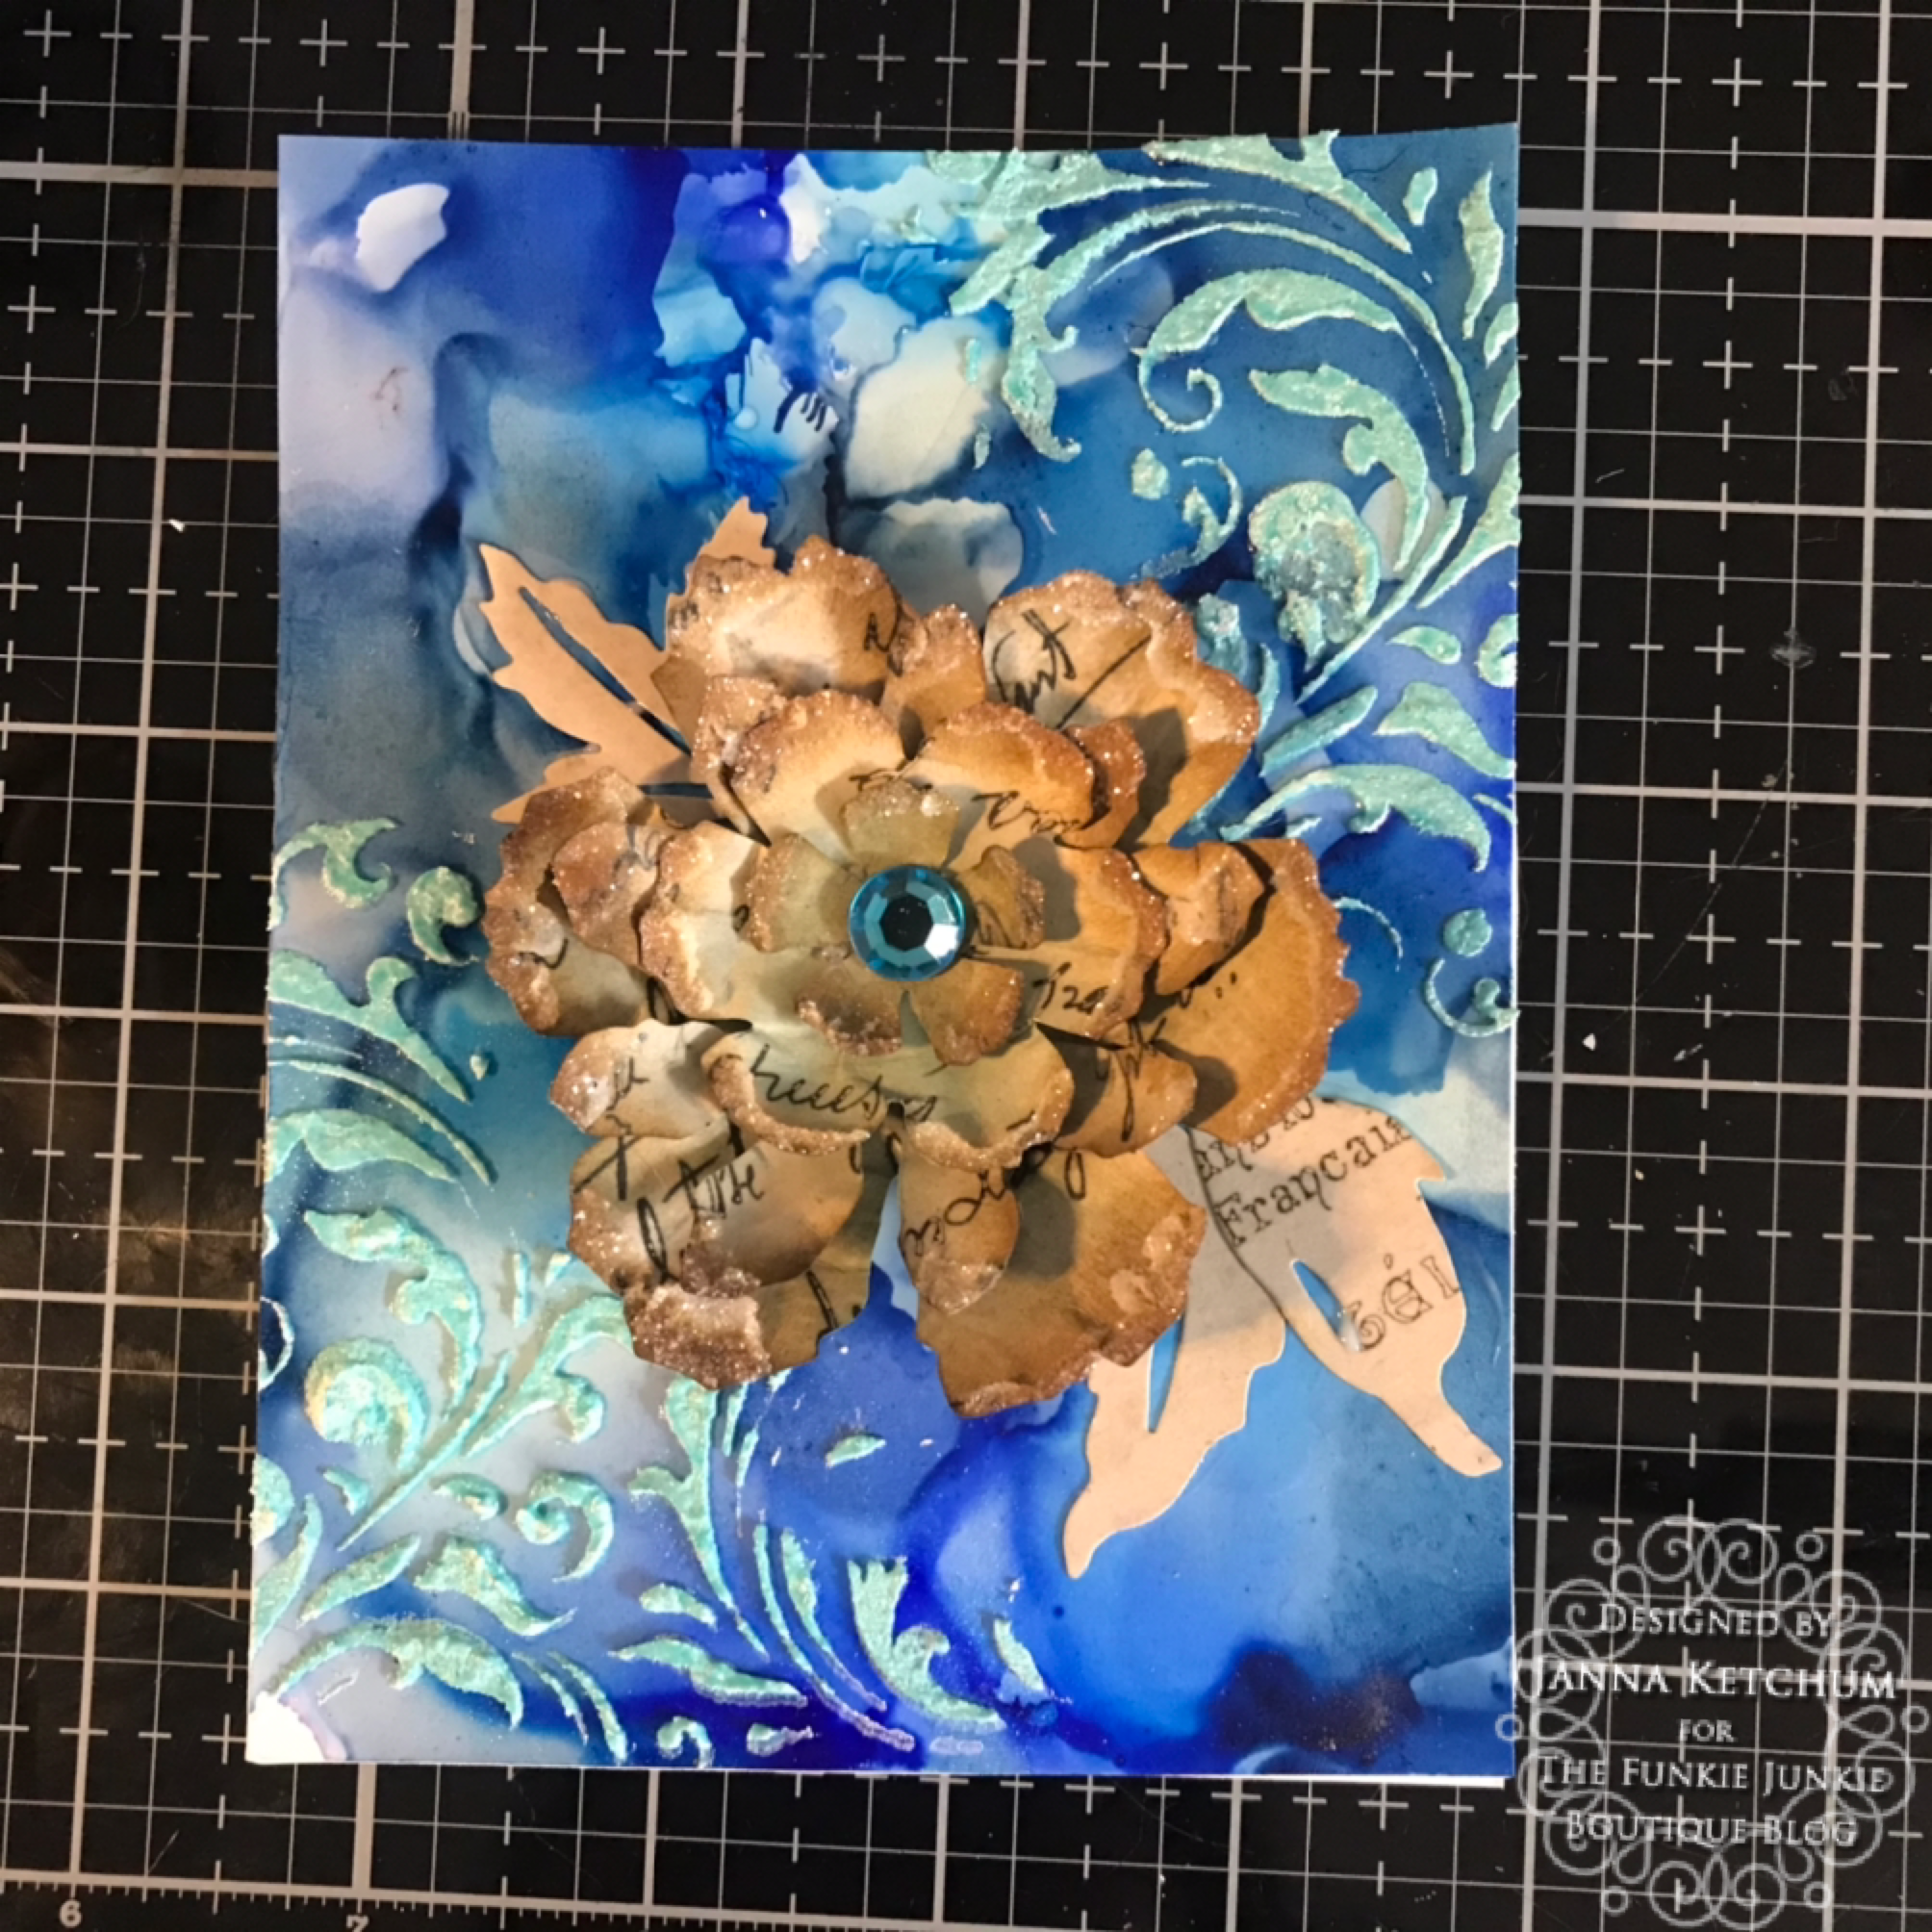
To start this card I decided to make an alcohol inked background. Starting on a piece of 7x5 Yupo paper I added a sprinkling of AI blending solution. Then I sprinkled on some monsoon, glacier, and cobalt Tim Holtz alcohol inks.
To get the ink to move more fluidly I added some more blending solution. With inks flowing nicely on the Yupo paper I used the TH ink blower tool to move the ink around and get some layers built up on the background. In total I added alcohol ink blending solution two more times in order to get good coverage on the page with the inks. Each time I used the ink blower to move the inks around.
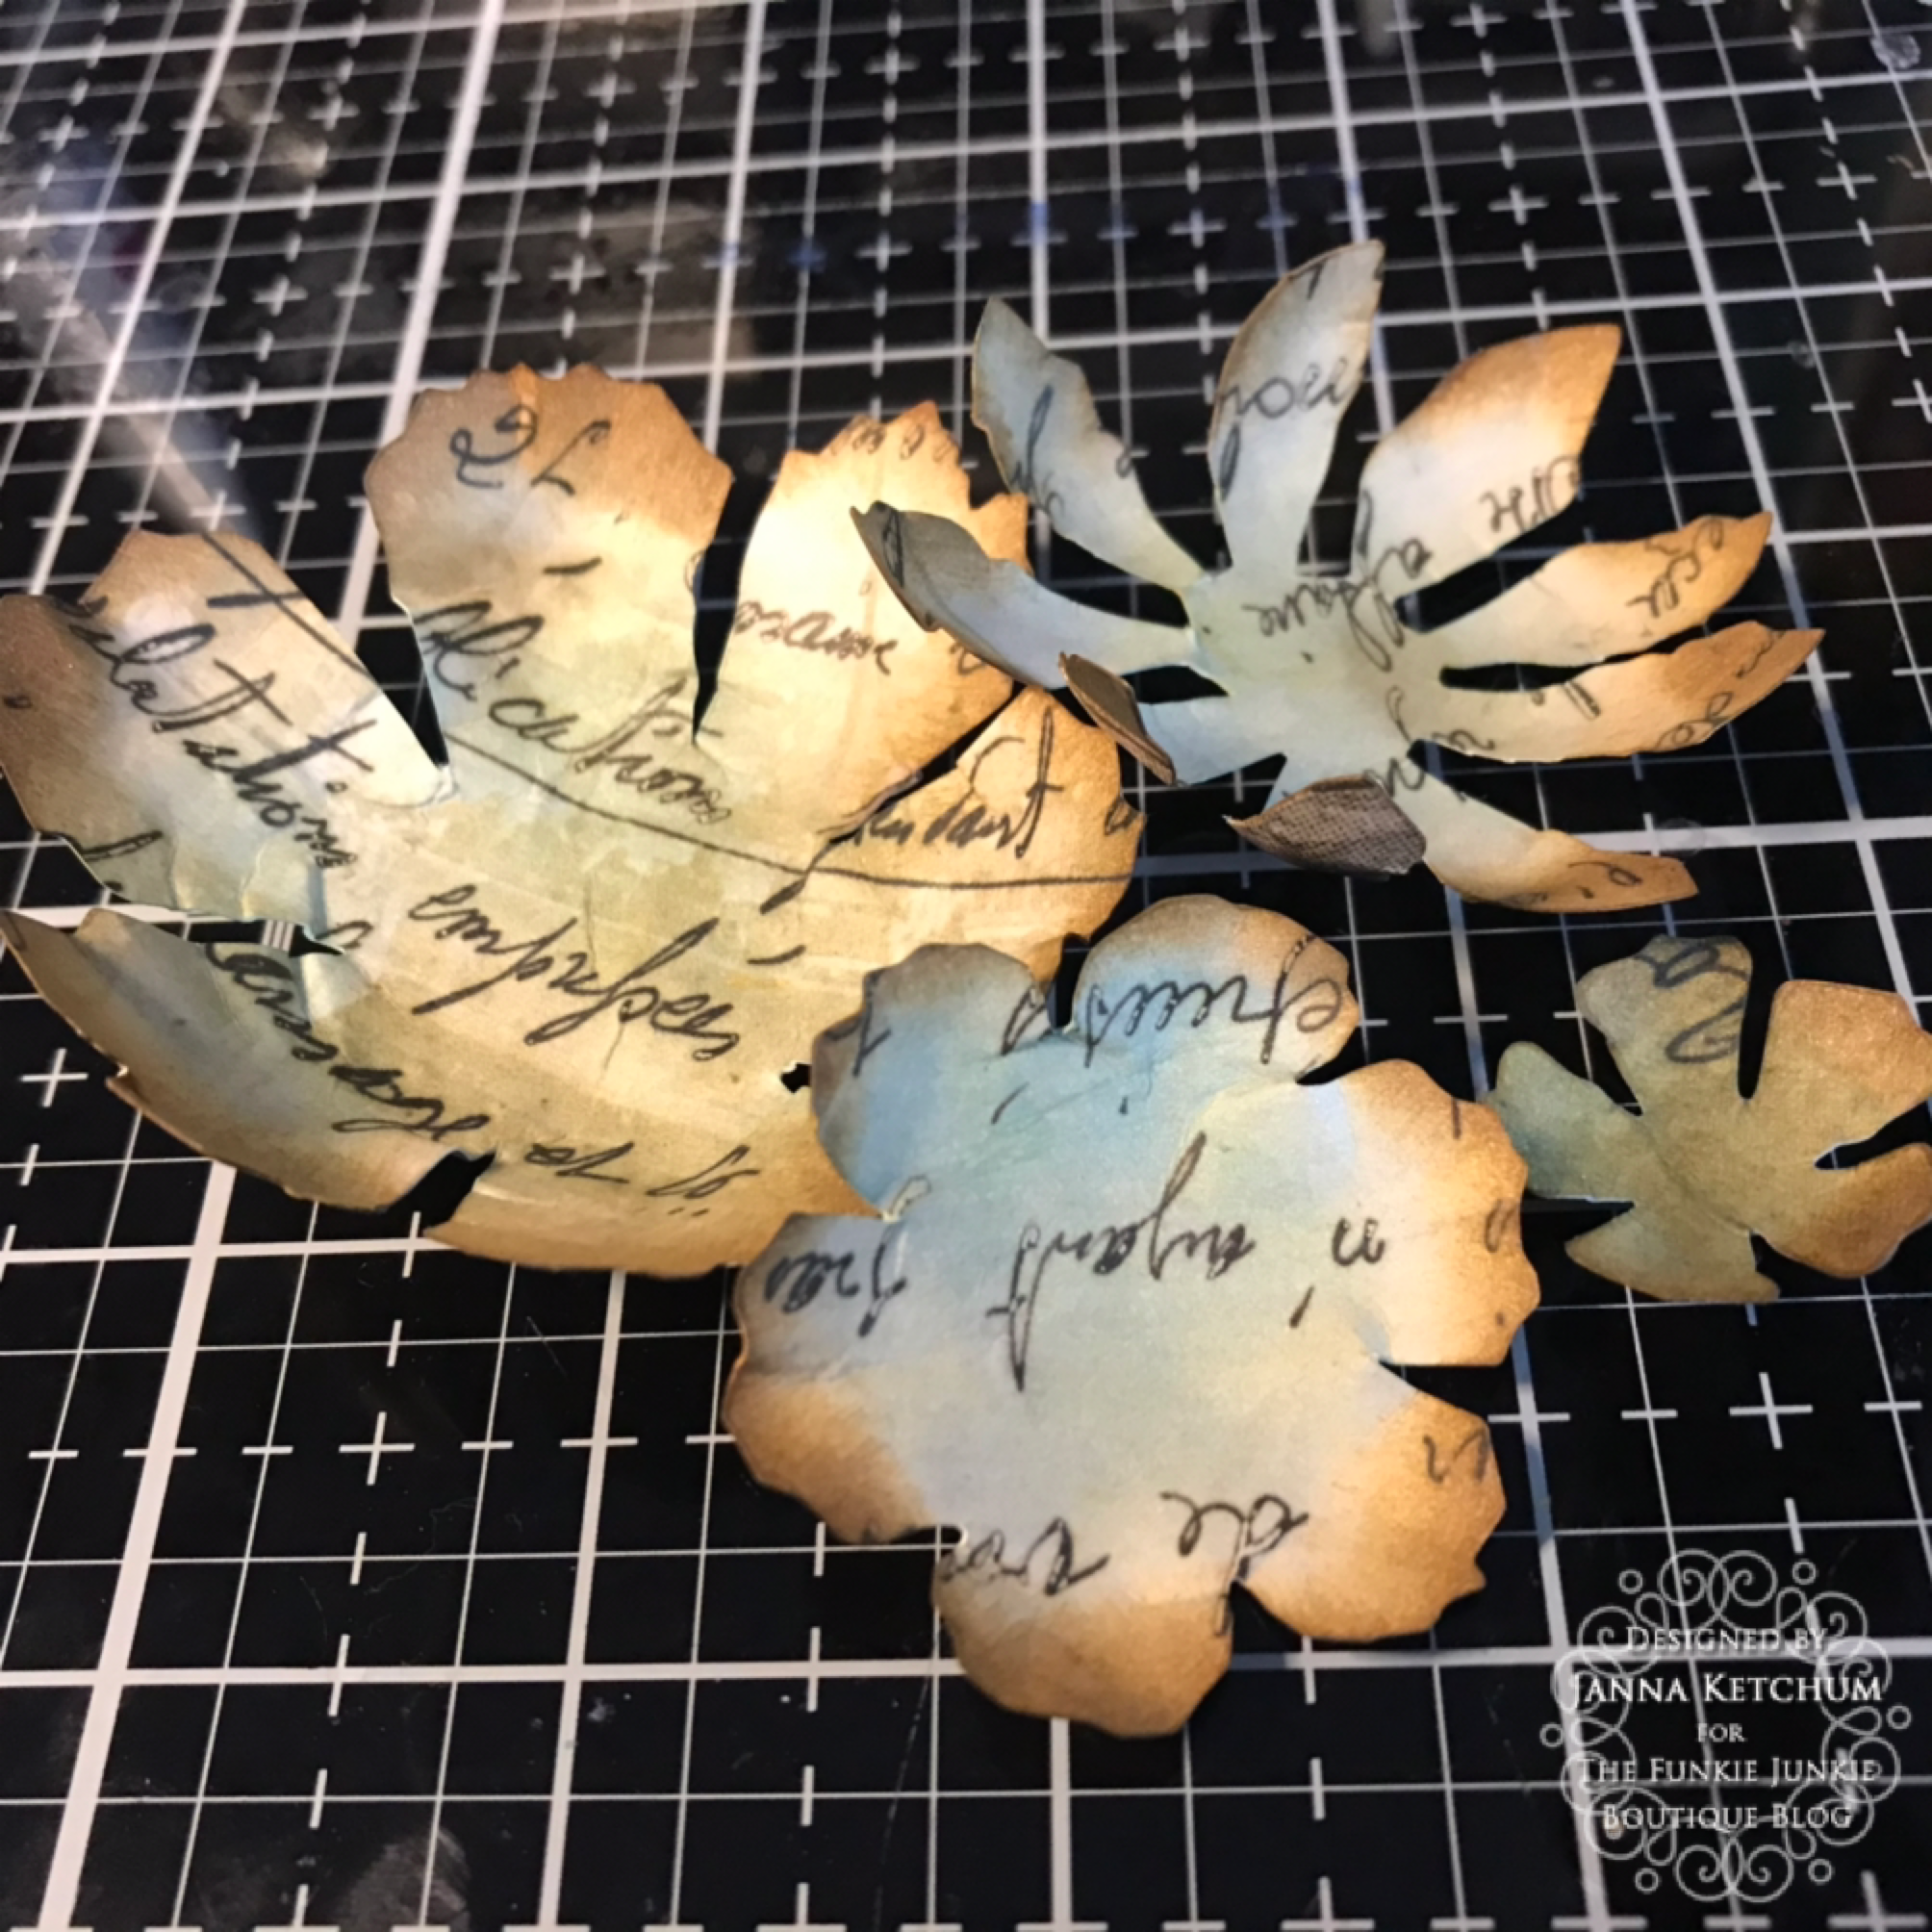
Then I die cut a set of tattered floral flowers (Sizzix Bigz die by Tim Holtz) from the French Industrial TH paper pack. After I cut a few leaves from the same paper using Sizzix thinlit dies brushstroke flower sets two and three.
Now to start adding a vintage vibe to this project. Taking some Vintage Photo Distress ink I inked around the edges of each of the flowers. I used a Ranger blending tool with some dome foam.
Next I added some Salvaged Patina Distress ink to the middle of each of the flowers.
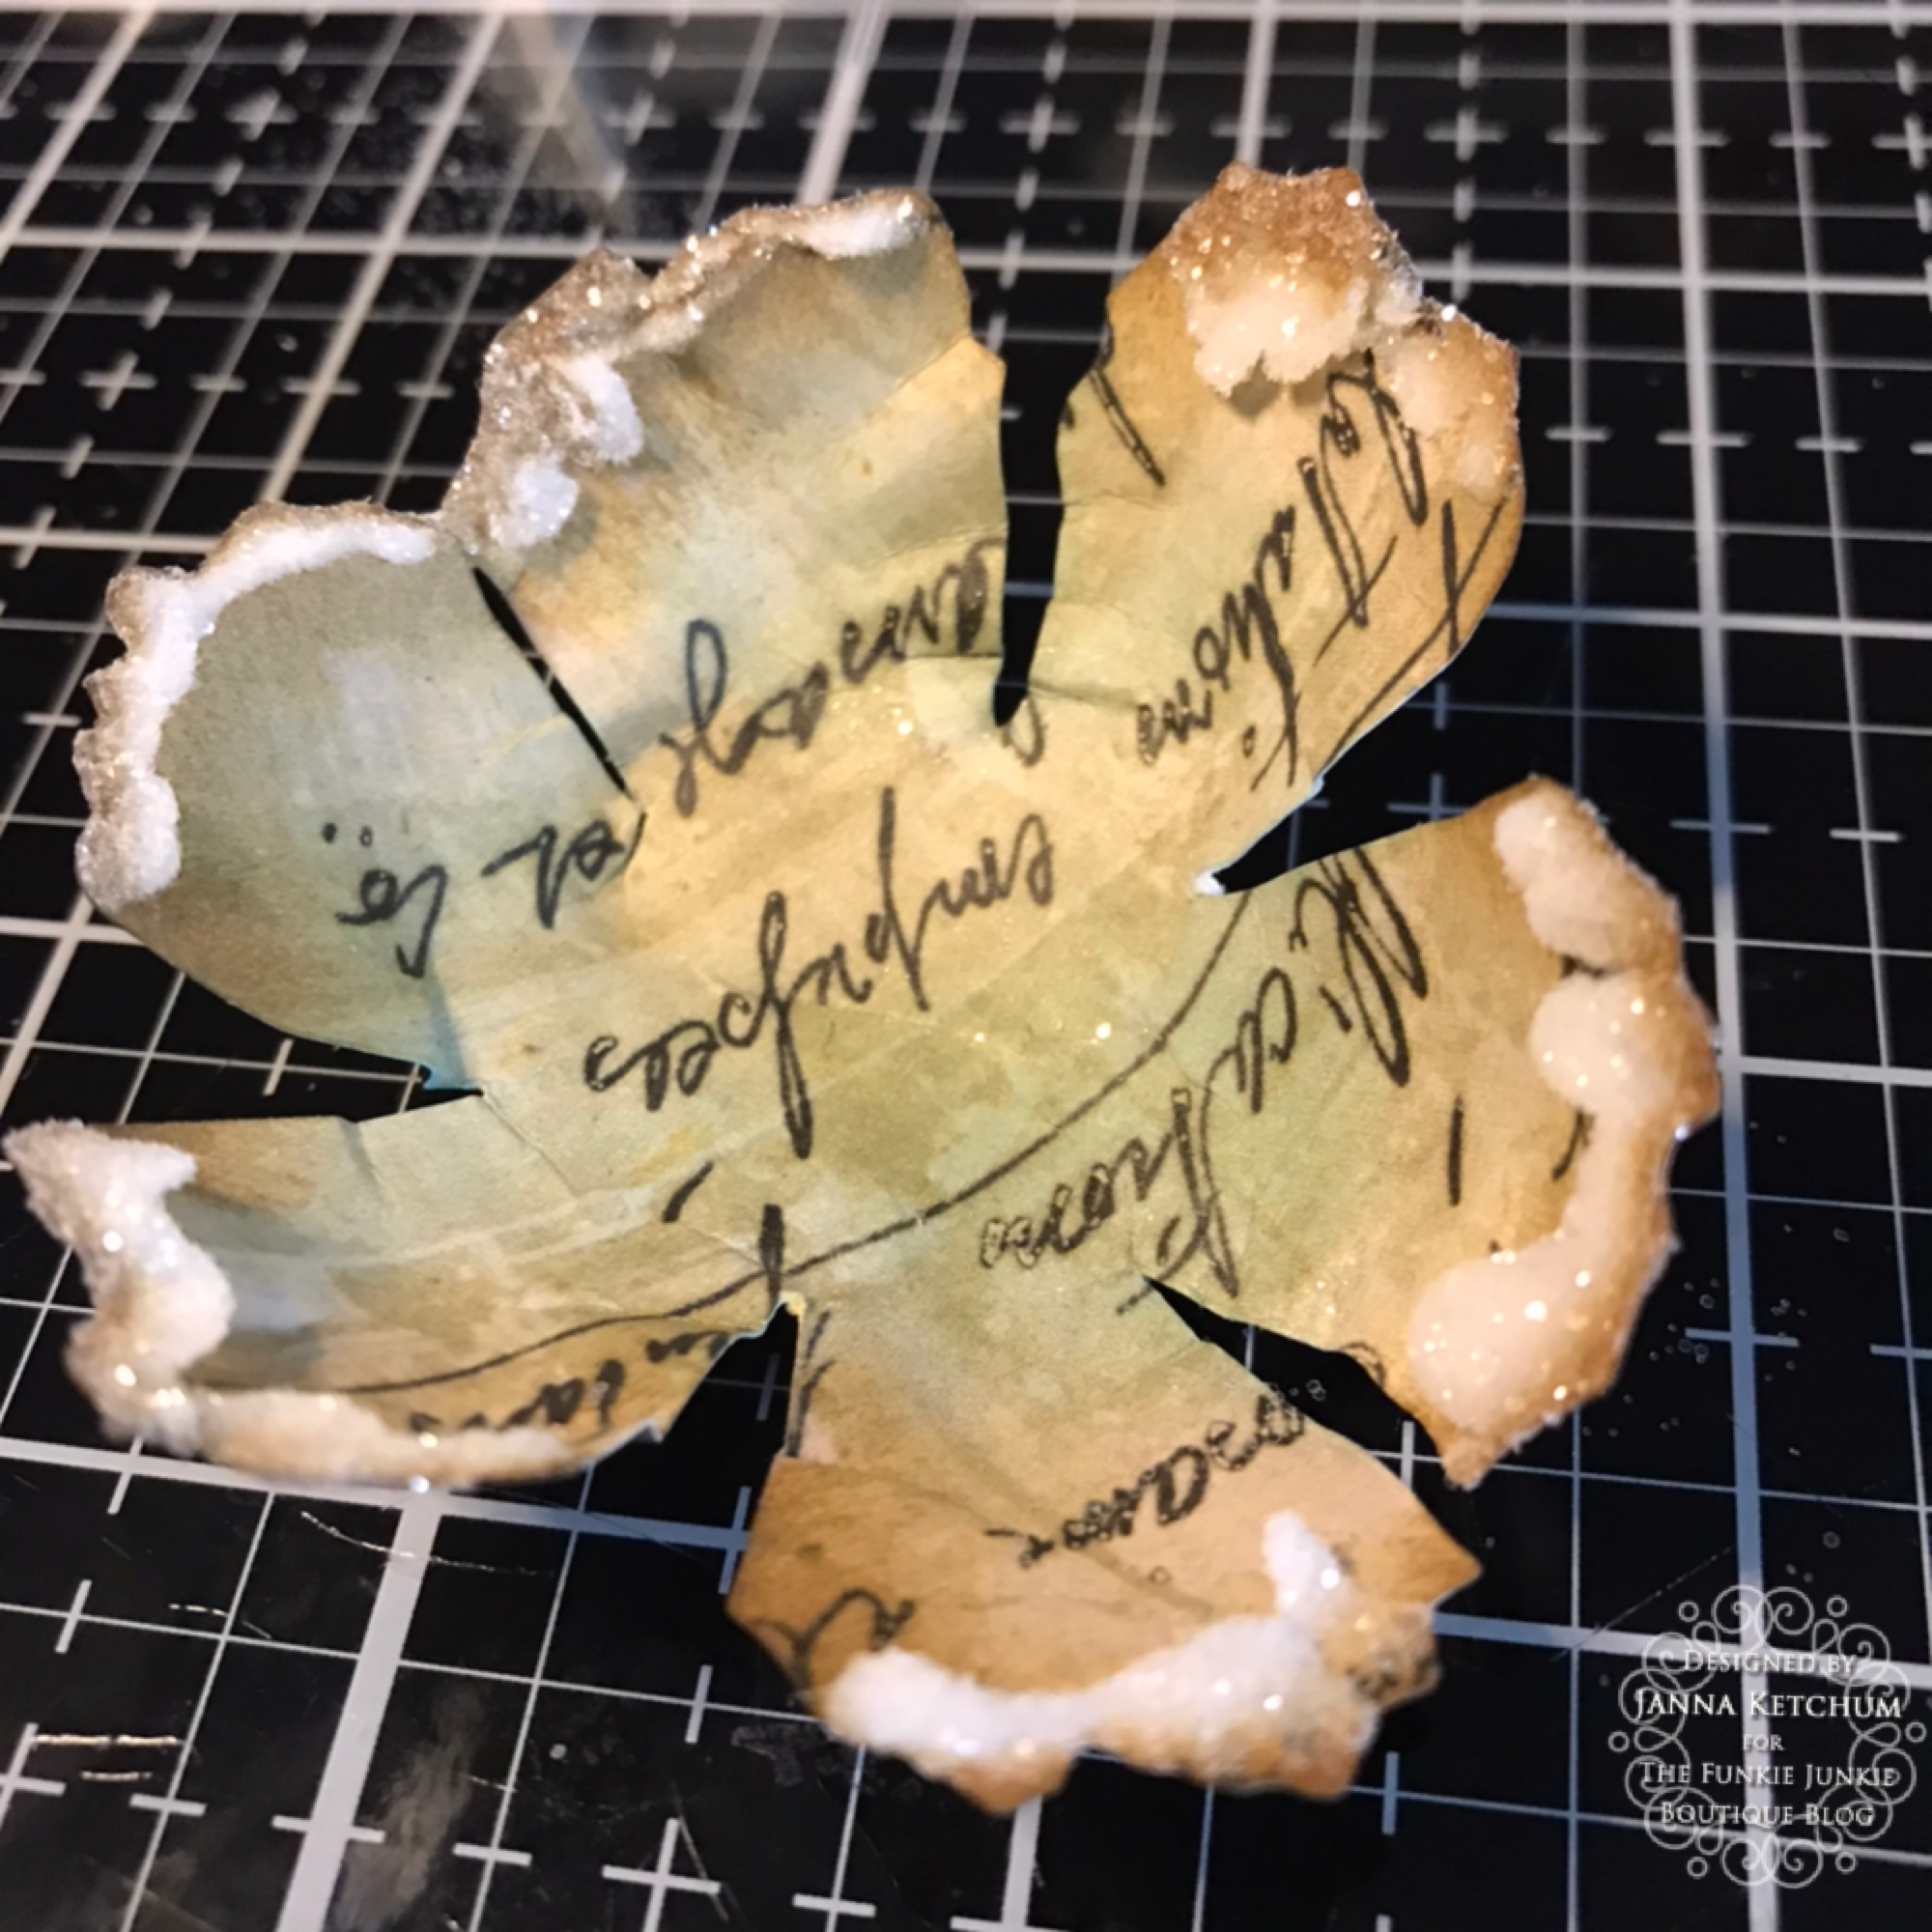
After the inking was done I shaped the flowers using the TH Sizzix shaping tools and foam pad. Laying a flower onto the black foam I spritzed the flower with my Distress mister. Then taking the larges shaping tool I began stippling in the middle of the largest flower.
Once the middle was starting to curve I started work on the petals. For the petals I pushed the shaping tool into the tip of the petal and worked my way towards the center of the flower. I repeated this step for each of the flowers. It still amazes me that simple flat paper can become something amazing and dimensional.
Time to add some glitz to the flowers. Using collage medium I smeared a little bit on each flower petal. Then I dipped each flower into distress glitter. This adds a lovely sparkly to the vintage grunge goodness.
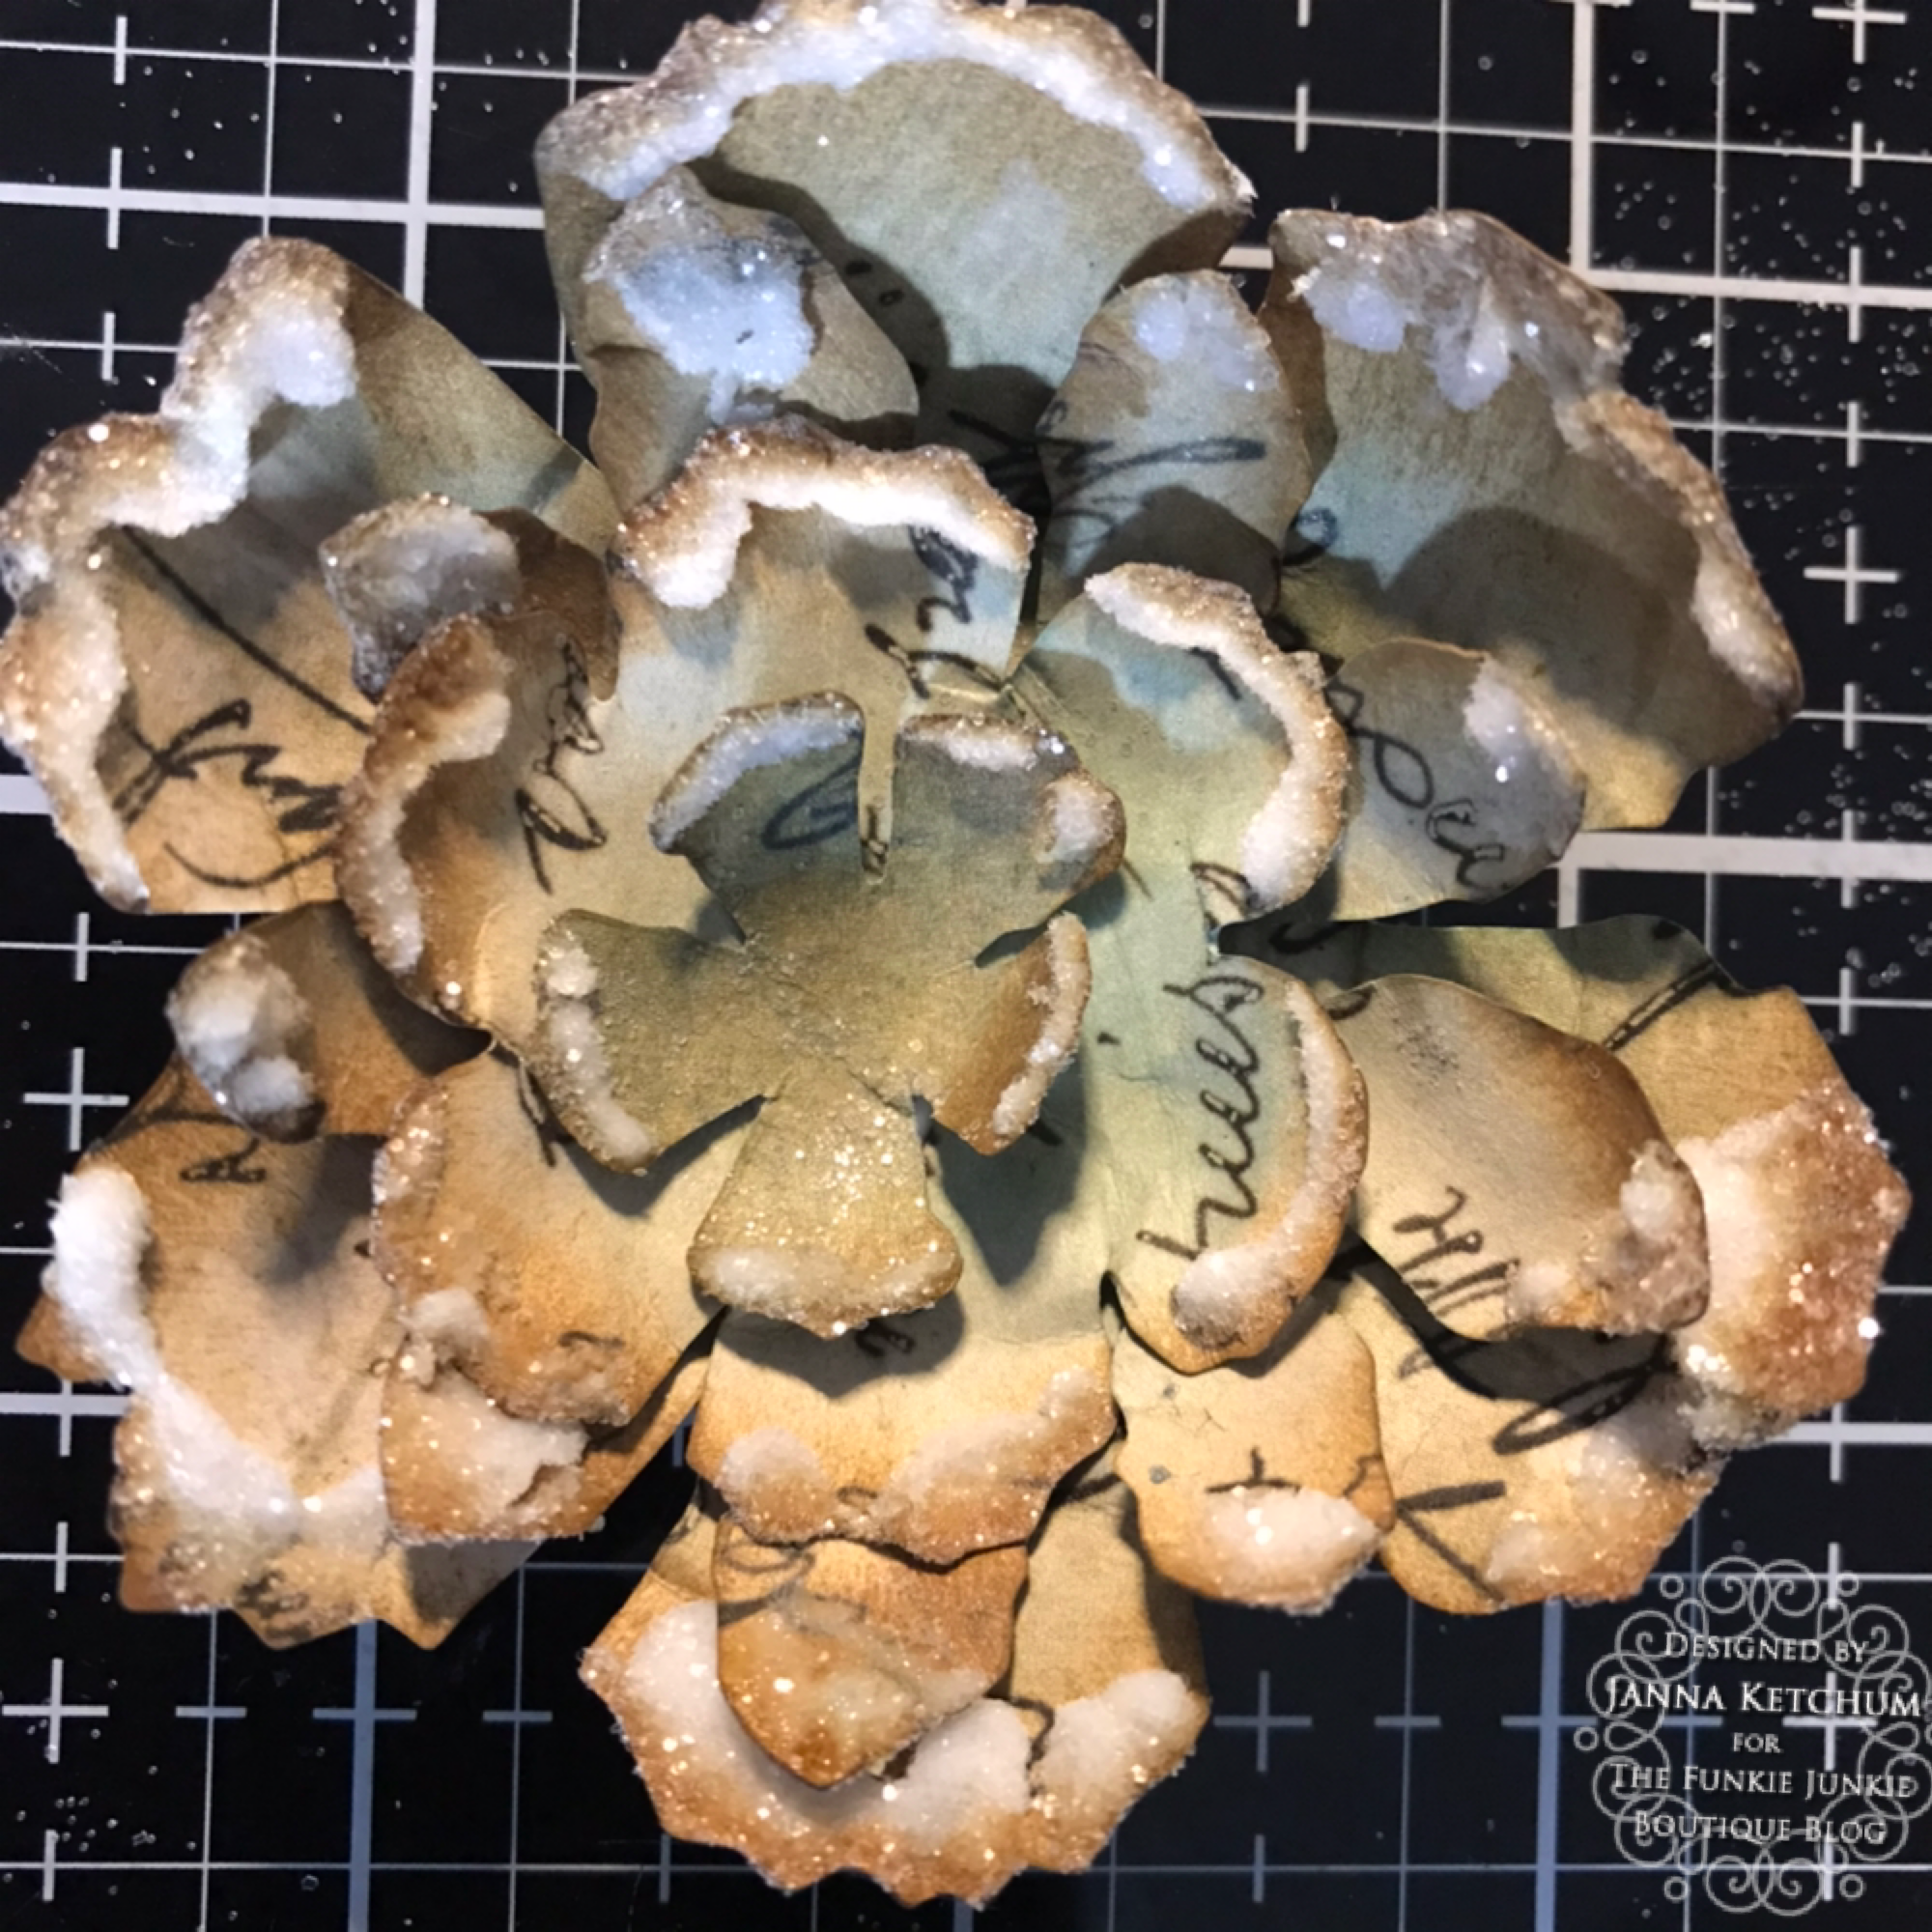
With all of the flowers glittered it is time to assemble the pieces. Starting with the medium flower I added collage medium to the bottom of it and started nesting the flowers together to from one large glitzy grungy flower. While assembling take note of the petals and try to off set them from one another. This helps to give the project some more depth.
Taking the inky background it is now time to add some texture. With the stencil THMS036 flourish I scraped some Distress grit paste through it with a Ranger pallet knife. This was done to the bottom left and top right corners of the alcohol inked background. Note clean stencil and knife soon after use. Hardened grit paste is not fun to get off a stencil. I gave mine a quick wash in the sink with some warm water.
With the grit paste still wet I added some Salvaged Patina Distress Glaze over the top. When adding glaze I like to keep some scrap paper under my project to catch the extra powder and so I can put the extra back in the jar. Now to let the grit paste dry. This will take between 15-30min. However, depending on the climate you're in it may take more or less time. In lower Quebec our weather is a bit humid so I find texture pasts can take up to 45min to dry, though running a fan will help speed up the process.
Now that the glaze is dry it is time to emboss it. Since I am working on Yupo paper I did not use an embossing gun and it might melt it. Instead I used my Ranger heat tool. Moving in circles I slowly embossed the glaze stuck to the grit paste. Once melted it formed a textured shiny layer on the background.
Time to put all the pieces together. Before attaching the big flower I added a blue sticky backed gem into the middle of it. Then the flower was attached to the background with some collage medium.
Next I tucked in a few die cut leaves from Brushstroke Flowers two and three, gluing them with collage medium.
For the last step I added a couple of quote stickers from the Tim Holtz metallic Idea-ology sticker book. I chose the quotes "Remember the now." and "Embrace your journey".
This concludes this grungy glitzy floral card tutorial. I hope you had fun following along. Don't forget to try out your own color combinations and try substituting flower dies that you have in your stash. Thank you for joining me today for some crafty fun. Don't forget to join us at The Funkie Junkie Blog challenge. I look forward to seeing all of your creative makes. Happy crafting. ~Janna
I can also be found on:
Instagram: @treasuresofthesea_jannak
Links to the Funkie Junkie for a bit of inspired shopping.
Collage medium


Beautiful swirling blues and background! Lovely layered flower! Welcome to the team! Thrilled that you joined us and are sharing your inspiration with us on the design team!
ReplyDeleteThank you so much! I am delighted to be here and look forward to sharing more with this team. 💟🎨
DeleteWelcome to the team Janna! It's so good to have you joining us. Love that inky background and what a great idea to add the glitter to the edges of your tattered flowers. Great tutorial x
ReplyDeleteThank you so much! It is great to be here. I had so much fun putting together this project. 💟🎨
DeleteYour card is stunning! I love those blues from the AI's as your backdrop to that amazing flower! Congratulations on joining the team, and I'm looking forward to seeing all your art going forward!
ReplyDeleteThank you very much! I am so excited to be here and look forward to sharing move creative fun. 💟🎨
Delete